Deus Ex: Mankind Divided™ - manual

Deus Ex: Mankind DividedManual

Enter
x

Navigating this manual

Welcome to the Deus Ex: Mankind Divided™ web manual.

You can use the Contents menu on the left to skip directly to the section you're looking for. Alternatively, click the Enter button to access the manual, and use the Next and Previous buttons to navigate page by page.

Can't find what you're looking for? There's even more information in the FAQs and ReadMe: you can view them using the buttons at the top of the screen.

Warnings & Ratings

Important Health Warning About Playing Video Games

Photosensitive Seizures

A very small percentage of people may experience a seizure when exposed to certain visual images, including flashing lights or patterns that may appear in video games. Even people who have no history of seizures or epilepsy may have an undiagnosed condition that can cause these “photosensitive epileptic seizures” while watching video games.

These seizures may have a variety of symptoms, including lightheadedness, altered vision, eye or face twitching, jerking or shaking of arms or legs, disorientation, confusion, or momentary loss of awareness. Seizures may also cause loss of consciousness or convulsions that can lead to injury from falling down or striking nearby objects.

Immediately stop playing and consult a doctor if you experience any of these symptoms. Parents should watch for or ask their children about the above symptoms—children and teenagers are more likely than adults to experience these seizures. The risk of photosensitive epileptic seizures may be reduced by taking the following precautions: Sit farther from the screen; use a smaller screen; play in a well-lit room; and do not play when you are drowsy or fatigued. If you or any of your relatives have a history of seizures or epilepsy, consult a doctor before playing.

Precautions to take during use

  • Sit a good distance away from the monitor.
  • Avoid playing if you are tired or have not had much sleep.
  • Make sure that the room in which you are playing is well lit.
  • Rest for at least 10 to 15 minutes per hour while playing a video game.
ESRB: M PEGI: 18

Deus Ex: Mankind Divided © 2016 Square Enix Ltd. All rights reserved. Originally developed by Eidos-Montréal. Deus Ex: Mankind Divided, Eidos-Montréal, and the Eidos logo are trademarks or registered trademarks of Square Enix Ltd. SQUARE ENIX and the SQUARE ENIX logo are registered trademarks of Square Enix Holdings Co. Ltd. Nixxes and the Nixxes logo are trademarks of Nixxes Software B.V. Developed for and published on Linux by Feral Interactive Ltd. Linux® is the registered trademark of Linus Torvalds in the U.S. and other countries. Feral and the Feral logo are trademarks of Feral Interactive Ltd. All other trademarks are property of their respective owners.

1

Introduction

The year is 2029, and mechanically augmented humans are now outcasts, completely segregated from the rest of society.

Now an experienced covert operative, Adam Jensen is forced to operate in a world that has grown to despise his kind. Armed with a new arsenal of state-of-the-art weapons and augmentations, he must choose the right approach, and who to trust, in order to unravel a vast worldwide conspiracy.

2

Installation

As part of the Steam download process, the game has already been installed on your computer. To start playing the game, read the Getting Started section.

Getting Started

  1. If it is not already running, launch the Steam application.

  2. Select Library.

  3. In the library, select Deus Ex: Mankind Divided, then select Play.

  4. The Deus Ex: Mankind Divided pre-game Options window will appear. Click on the Play button. The game will launch.

  5. After the loading screens, the Main Menu will appear. Select Story.

  6. Select New Game.

  7. The New Game screen will appear, where you can choose the game’s difficulty. Select a difficulty setting. If this is your first time playing a Deus Ex title, we recommend that you select Give me a Challenge.

  8. A dialog box will appear offering you the chance to watch a recap of the events from Deus Ex: Human Revolution. If you haven’t played Deus Ex: Human Revolution, we recommend that you watch the video.

  9. After the opening video, you will find yourself aboard a Task Force 29 aircraft, being briefed for an undercover mission in Dubai…

3

Controls

You can play Deus Ex: Mankind Divided using either a keyboard and mouse or a gamepad.

The instructions in this manual refer to the default keyboard controls. If you have customized your controls or are using a gamepad, the controls listed here will not apply.

Keyboard

The default keyboard controls are detailed below. You can customize your keyboard configuration by selecting OptionsMouse & KeyboardKeybindings from the Main Menu.

Move W/A/S/D or Arrow keys
Sprint Shift
Walk Caps Lock
Jump Space
Interact E or Return
Crouch Control or C
Enter/Exit Cover F
Fire Left Mouse button
Iron Sight Right Mouse button
Reload R
Grenade G
Holster Weapon H
Takedowns Q
Remove Mark 'n Track T

Remote Hack E
Remote Hack: Stop! Worm Q
Throw Object Left Mouse button
Rotate Object Right Mouse button
In-Game Menu Tab
Inventory Menu I
Map Menu M
Objectives Menu O
Database Menu L
Tech Tree Menu P
Weapon Management Y
Inventory Wheel V
Augmentation Wheel N
Quick Save F5
Quick Load F9
Augmentation 1 – 4 F1 – F4
Quick Augmentation Middle Mouse button
Previous/Next Quick Slot Scroll up/down
Quick Slot 1 – 9 1 – 9
Quick Slot 10 0
Hack Q
4

Gamepad

You can play Deus Ex: Mankind Divided using a gamepad.

The diagram on this page is based on a standard controller layout; all gamepads have similar buttons but some may differ in layout from the gamepad shown here. For more information, see Can I play Deus Ex: Mankind Divided with a gamepad? in the FAQs.

Gamepad control diagram

Move
Camera
Fire
Iron Sight
Throw Secondary Weapon
Interact/Reload
Jump
Takedowns
Sprint
Augmentations
Quick Augmentations ← / ↑ / ↓ / →
Enter Cover/Augmentation Wheel (click)
Crouch/Inventory Wheel (click)
In-Game Menu
Pause Menu
5

Main Menu

Main Menu of Deus Ex: Mankind Divided

Story – Start a new game or load a saved game in Deus Ex: Mankind Divided’s main story.

Breach – Play Deus Ex: Mankind Divided – Breach, an arcade-style puzzle shooter mode.

Jensen’s Stories – Play DLC missions that you have purchased.

Extras – Watch a recap of the events of Deus Ex: Human Revolution, as well as trailers and credits for Deus Ex: Mankind Divided.

Options – Change display, audio, language, controls and gameplay settings.

Shop – Purchase gear for use in Story mode, and other DLC.

Square Enix – Link your game to your Square Enix account.

Game Screen

Game Screen showing Deus Ex: Mankind Divided's HUD

1. Energy
2. Health
3. Hotkey bar
4. Radar
5. Weapon/ammo
6. Grenades
7. Augmentations
6

Energy

Energy Bar

The blue meter in the bottom-left corner of the screen shows your energy.

Your energy drains as you use your augmentations and perform takedowns. It regenerates whenever you are not using it. You can restore energy quickly by using Biocells, which can be found or bought throughout the game.

Using certain augmentations lowers your maximum energy (indicated by a white line on the energy meter). To reset your maximum energy, you must use a Biocell.

Health

Health Bar

The green meter in the bottom-right corner of the screen shows your health.

Your health drains as you take damage in combat. It regenerates whenever you are not taking damage. You can restore health quickly by using HypoStims, which can be found or bought throughout the game.

XP and Praxis Points

XP Bar

You earn experience points (XP) for a variety of achievements, including completing objectives, killing enemies, and exploring without being spotted. When you earn enough experience points, you’ll gain a Praxis Point, which can be used to unlock or upgrade an augmentation.

7

Inventory Wheel

Inventory wheel

To open the inventory wheel, press the V key. Left-click on any item in the wheel to equip or use it.

You can assign items to hotkeys, so you can equip them quickly without opening the inventory wheel. To assign an item to a hotkey, place the mouse cursor over it and press a number key between 0-9. You’ll then be able to use the item quickly at any time by pressing the hotkey to which you have assigned it.

Augmentation Wheel

Augmentation wheel

To open the augmentation wheel, press the B key. This wheel shows your available augmentations.

To assign an augmentation to a hotkey, place the mouse cursor over it, and press F1, F2, F3, F4 or the Middle Mouse button. You’ll then be able to use the augmentation quickly at any time by pressing the hotkey to which you have assigned it.

8

In-Game Menu

Press the Tab key to bring up the in-game menu. From here, you can access the Inventory, Augmentations, Crafting, Objectives, Map, Database and Guide tabs.

Inventory

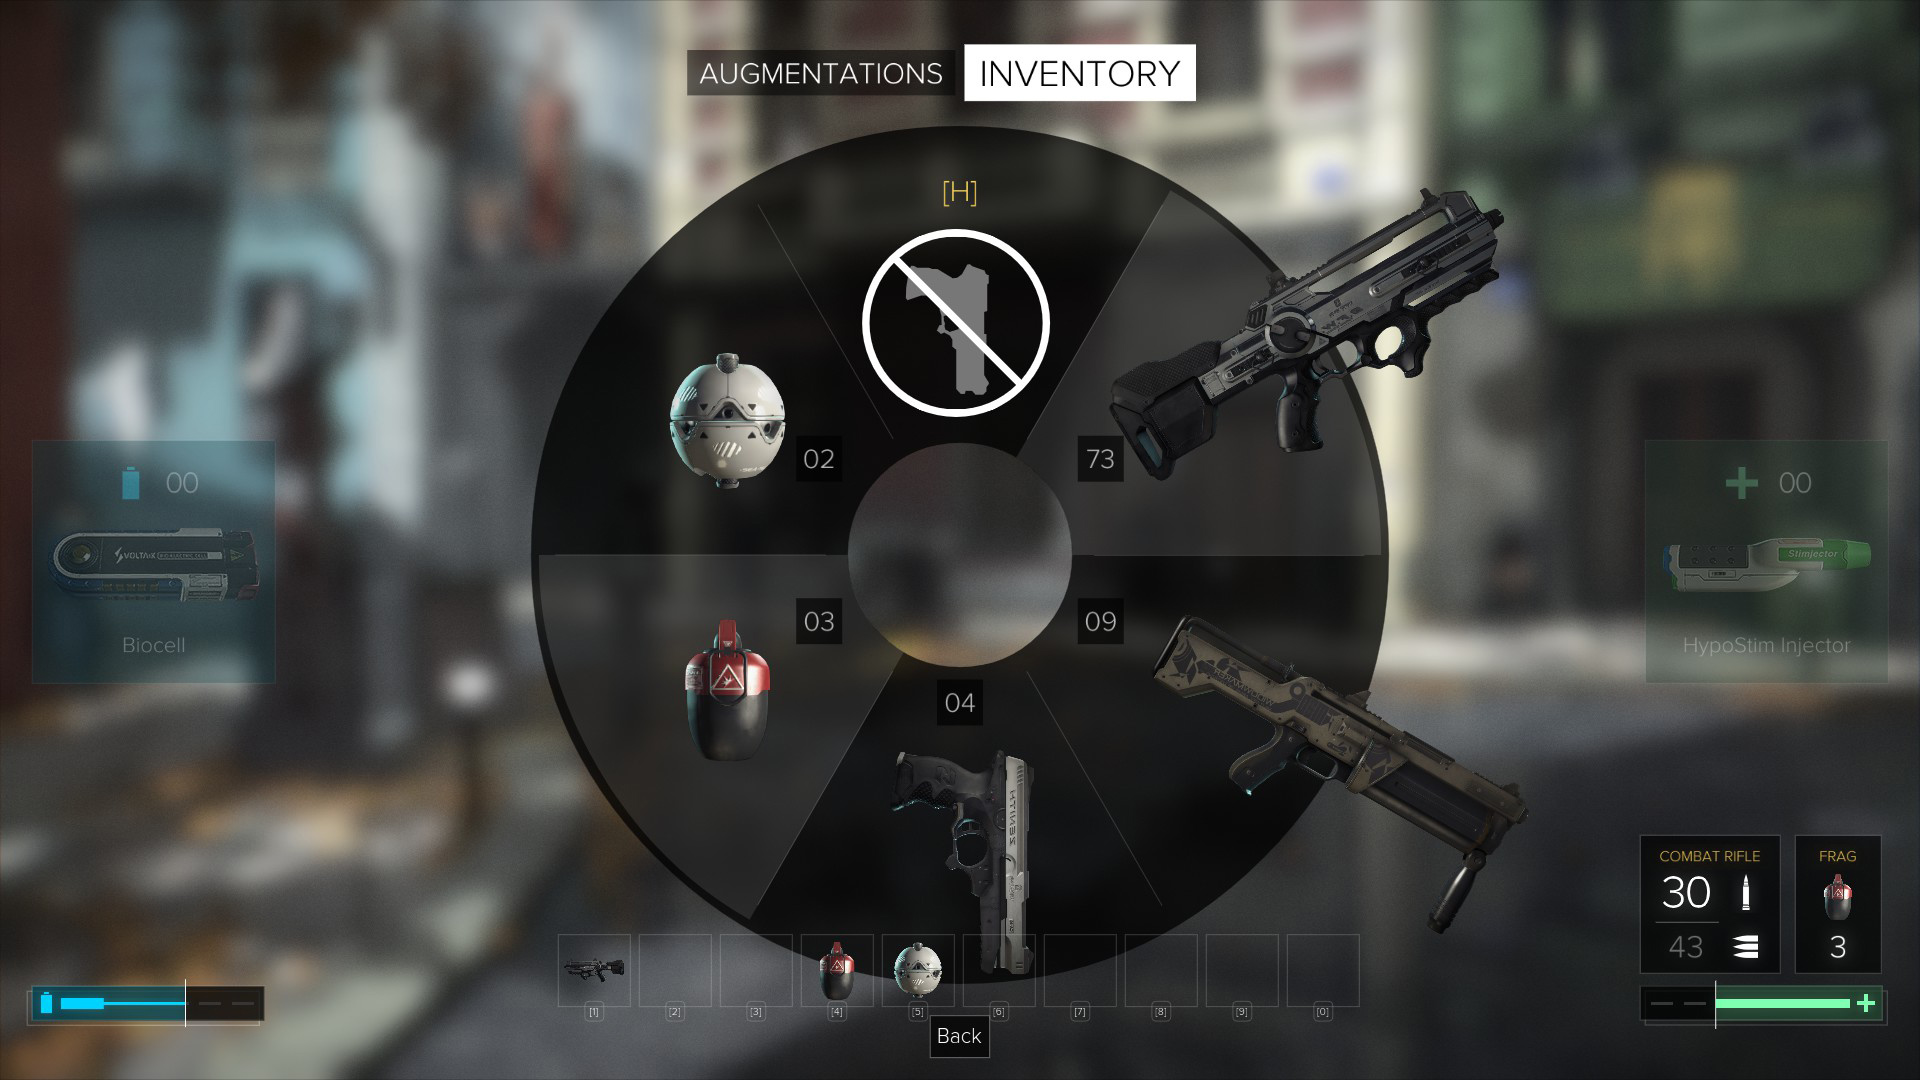
The Inventory tab shows the items you are currently carrying, and allows you to examine, move, customize and discard items.

Augmentations

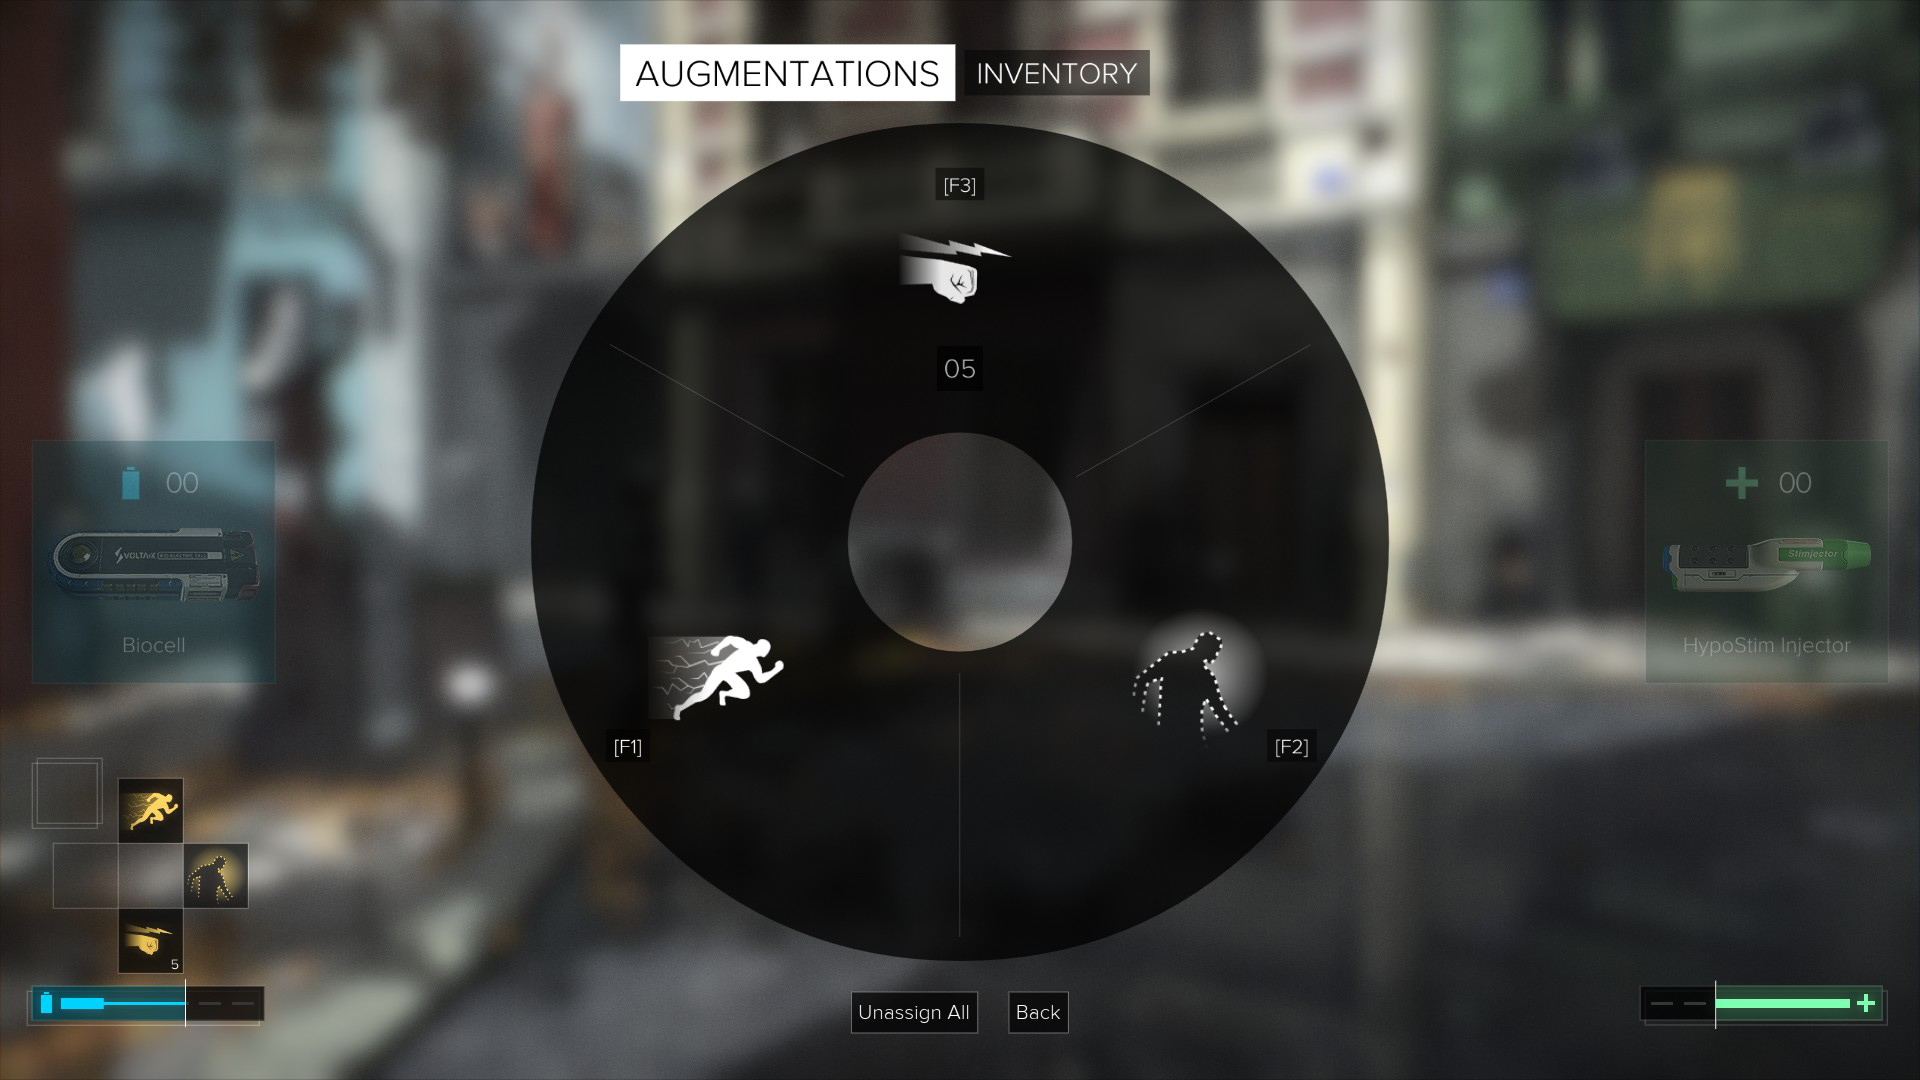
The Augmentations tab allows you to view the augmentations upgrade tree.

Augmentations can be unlocked or upgraded using Praxis Points. Some augmentations require more than one Praxis Point to unlock or upgrade.

Crafting

The Crafting tab allows you to craft useful items, such as Multi-Tools and Biocells. Crafting requires ”parts”, which you can find or buy throughout the game. The number of crafting parts you have is shown in the top-left corner of the menu.

Below this is a list of the blueprints you currently have, which show how many crafting parts each item costs. To craft an item, click on its blueprint. You’ll find additional blueprints as you play the game.

Objectives

The Objectives tab shows your current missions, side missions, points of interest and a history of your completed objectives.

You can click on any mission or side mission on this screen to select it; this highlights the objective on your map and radar, making it easier to find.

Map

The Map tab displays an overhead map of your current location. To view a key of all the map symbols, select Legend.

Database

The Database tab records all of the emails, pocket secretaries, ebooks, story items and pieces of Breach software that you’ve found.

Guide

The Guide tab is a quick reference to the key concepts and systems of Deus Ex: Mankind Divided. New content will be added to the guide as you play the game and encounter new systems.

9

Combat

Takedowns

When you are close enough to an enemy, you will be given the option to perform a lethal or non-lethal takedown.

Lethal takedown icon Holding down the Q key will perform a lethal takedown. A lethal takedown will kill the enemy, but is noisy and will alert nearby enemies to your presence.

Non-lethal takedown icon Tapping the Q key will perform a non-lethal takedown. A non-lethal takedown is quieter, and may not alert nearby enemies. However, your target is only rendered unconscious, and will be woken up if discovered by an ally.

Performing a takedown uses energy. If your energy is too low, you will be unable to perform either takedown.

Weapons

As you play the game, you will also find a number of different weapons. With a weapon equipped, left-click to fire. For a more accurate shot, you can aim down your sights by holding down the Right Mouse button.

If you have a grenade equipped, press and hold the G key and move the mouse to aim your throw; the grenade’s arc will be shown on screen. When you’re ready to throw the grenade, release the G key.

Customizing Weapons

You can customize and upgrade your weapons in a variety of ways.

To customize or upgrade a weapon, select it in the inventory, then select Customize. You will be taken to a screen where you can upgrade the weapon’s damage output, ammo capacity and rate of fire. Upgrades cost crafting parts, which you can find or buy throughout the game.

In the top-left corner of the screen, you can also see available upgrades or attachments that can be applied to a weapon, such as adding a laser sight or scope. You’ll need to find these attachments before you can apply them to a weapon.

You can also customize your currently equipped weapon on the fly by pressing the Y key during play, without having to enter the inventory menu.

10

Cover

Hiding in cover allows you to remain undetected while sneaking past enemies, or protect yourself from gunfire during combat.

To enter cover, stand next to a wall or other surface and press the F key.

While in cover, left-click to duck out of cover and fire your weapon. To aim more accurately, hold the Right Mouse button to aim around the cover, and left-click to fire. You’re exposed while aiming; release the Right Mouse button to return to cover.

Rounding Corners
When you reach a corner, press and hold the Space bar to move around it while staying in cover.

Swapping Cover
To move quickly from one area of cover to another, move the mouse cursor to a nearby area of cover; if you can move into cover there, a silhouette will appear at that position. Press the Space bar to quickly move to that position.

You can also roll quickly between adjacent areas of cover (for example, from one side of a doorway to another). If this is possible, an A or D key will appear on screen. To roll, hold the indicated key, then press the Space bar.

Vaulting over Cover
While taking cover behind a low surface, you can vault over it by pressing the Space bar.

11

Hacking

As you explore, you’ll encounter locks, safes and computers than can be hacked.

To hack a device, approach it and press the E key. You’ll see the device’s Security Rating from 1-5. The higher the rating, the more difficult the device is to hack. The maximum rating of device that you are able to hack is determined by the level of your Hacking Capture augmentation.

To attempt to hack the device, press the Q key. The network you’re attempting to infiltrate will appear. Your entry point into the network is the blue I/O port. From here, your goal is to capture all of the green registries on the network.

To capture a registry, you must first capture all the nodes between it and your entry point.

Capturing Nodes

Left-click on a node to select it; you will see its security rating and the percentage chance of being detected when capturing that node. Nodes with a higher security rating take longer to capture and have a higher detection percentage.

To capture the node, press the C key. You can only capture nodes that are directly connected to one of your currently captured nodes.

If you are detected, the red diagnostic node will be activated. The diagnostic node will attempt to trace you and reach your entry point, the blue I/O port. A countdown timer will indicate how long you have until the diagnostic trace reaches the I/O port. If the timer reaches zero before you capture all of the registries, your hacking attempt will fail and you will be locked out of the network for a short time. To prevent this from happening, click on Disconnect before the timer runs out to abort the hacking attempt.

12

Advanced Hacking

Apart from upgrading your hacking augmentations, there are a number of ways to improve your chances of success when hacking.

Fortify Nodes

You can fortify nodes you have already captured by selecting them and pressing the F key. Fortified nodes will take longer to be recaptured by the diagnostic trace.

Software

There are pieces of hacking software with useful benefits that you can purchase or find throughout the game. Each piece of software is a single-use item: when you activate the software during hacking, it’ll be deducted from your inventory.

Datascan
The Datascan software reveals the location and contents of all datastore nodes on the network. It also reveals any hidden firewalls. To use the Datascan software, press the 1 key at any time.

Overclock
The Overclock software increases the speed at which you can capture and fortify nodes for a few seconds. To use the Overclock software, press the 2 key at any time.

Nuke
The Nuke software instantly captures a node of any rating, but the diagnostic trace will detect you immediately after you use it. To use the Nuke software, select a node and press the N key

Reveal
The Reveal software uncovers all of the hidden nodes on a network; use it when entering a higher-rated network that obscures the extent of the available nodes. To use the Reveal software, press the 3 key at any time.

Stealth
The Stealth software allows you to capture or fortify a single node, or pass a firewall, with no chance of being detected. To use the Stealth software, press the 4 key at any time.

Stop! Worm
The Stop! Worm software freezes the diagnostic trace for a few seconds. To use the Stop! Worm software, press the 5 key during a trace attempt.

13

Breach

Deus Ex: Mankind Divided – Breach is an innovative game mode included with Deus Ex: Mankind Divided, which is separate to the game’s main Story mode.

As a Ripper, a hacker in the year 2029, your objective is to obtain and sell highly classified corporate data by infiltrating some of the world’s most secure servers, using the funds you acquire to upgrade both your skills and arsenal.

Breach combines arcade-style levels with unique puzzle shooter gameplay, and allows you to compare your performance to that of other players on the online leaderboards.

To play Breach, select Breach from the Main Menu.

14

Technical Support

Every effort has been made to make Deus Ex: Mankind Divided as compatible with current hardware as possible. However, if you are experiencing problems when running Deus Ex: Mankind Divided, please read on.

The FAQs for this version of the game can be found by following the link below:

http://support.feralinteractive.com/docs/en/deusexmd/latest/linux/faqs/

Contacting Feral

If the FAQs and/or updates do not solve your problem, then please feel free to contact us via email.

In your email, please include a brief description of the problem you have experienced with Deus Ex: Mankind Divided. We will do our best to help you.

email: linuxsupport@feralinteractive.com

15

Warranty

Please check the warranty information provided by Steam.

Credits

Originally developed by:
Eidos-Montréal
Originally published by:
Square Enix
Linux development by:
Feral Interactive
Linux publishing by:
Feral Interactive