Company of Heroes 2 - manual

Company of Heroes 2Manual

Enter
x

Navigating this manual

Welcome to the Company of Heroes 2 web manual.

You can use the Contents menu on the left to skip directly to the section you're looking for. Alternatively, click the Enter button to access the manual, and use the Next and Previous buttons to navigate page by page.

Can't find what you're looking for? There's even more information in the FAQs and ReadMe: you can view them using the buttons at the top of the screen.

Warnings & Ratings

Important Health Warning About Playing Video Games

Photosensitive Seizures

A very small percentage of people may experience a seizure when exposed to certain visual images, including flashing lights or patterns that may appear in video games. Even people who have no history of seizures or epilepsy may have an undiagnosed condition that can cause these “photosensitive epileptic seizures” while watching video games.

These seizures may have a variety of symptoms, including lightheadedness, altered vision, eye or face twitching, jerking or shaking of arms or legs, disorientation, confusion, or momentary loss of awareness. Seizures may also cause loss of consciousness or convulsions that can lead to injury from falling down or striking nearby objects.

Immediately stop playing and consult a doctor if you experience any of these symptoms. Parents should watch for or ask their children about the above symptoms—children and teenagers are more likely than adults to experience these seizures. The risk of photosensitive epileptic seizures may be reduced by taking the following precautions: Sit farther from the screen; use a smaller screen; play in a well-lit room; and do not play when you are drowsy or fatigued. If you or any of your relatives have a history of seizures or epilepsy, consult a doctor before playing.

Precautions to take during use

  • Sit a good distance away from the monitor.
  • Avoid playing if you are tired or have not had much sleep.
  • Make sure that the room in which you are playing is well lit.
  • Rest for at least 10 to 15 minutes per hour while playing a video game.
ESRB: M PEGI: 18

© SEGA. Originally developed by Relic Entertainment. Developed for and published on Linux and Mac by Feral Interactive Ltd. Uses Miles Sound System. Copyright (C) 1991-2015 by RAD Game Tools, Inc. MPEG Layer-3 playback supplied with the Miles Sound System from RAD Game Tools, Inc. MPEG layer-3 audio compression technology licensed by Fraunhofer IIS and THOMSON multimedia. Company of Heroes 2 uses Havok: © Copyright 2012 Havok.com Inc. (or its licensors). All Rights Reserved. See www.havok.com for details. Uses Autodesk® Scaleform® Copyright © 2012, Autodesk, Inc. SEGA, the SEGA logo, Relic Entertainment and Company of Heroes are either registered trade marks or trade marks of SEGA Corporation. All rights reserved. Linux® is the registered trademark of Linus Torvalds in the U.S. and other countries. Mac and the Mac logo are trademarks of Apple Inc., registered in the U.S. and other countries. Feral and the Feral logo are trademarks of Feral Interactive Ltd. All other trademarks, logos and copyrights are property of their respective owners.

1

Welcome to Company of Heroes 2

In June 1941, following his successes in Western Europe, Hitler launched Operation Barbarossa, a full-scale invasion of the Soviet Union. Over the months that followed, the Wehrmacht were able to penetrate as far east as Moscow.

However, after early victories, Operation Barbarossa stalled. In the great expanse of the Russian countryside, German supply lines were stretched, and not having expected the campaign to last into winter, the Wehrmacht were ill-prepared for the conditions they would face. The winters of the Second World War were some of the bitterest in Russia’s history.

For the next four years, the two nations were locked in a conflict along the Eastern Front. From Moscow to Stalingrad, Warsaw to Berlin, war raged from Germany across the Soviet Union and back again.

Company of Heroes 2 challenges you to take command of the Red Army on the Eastern Front through the most decisive moments of the Second World War. Engage in intense real-time skirmishes, seamlessly coordinate infantry, armor and artillery on an ever-changing battlefield, and endure freezing conditions, fighting half-blind through perilous blizzards.

Welcome to the Eastern Front, Commander.

2

Installation

As part of the Steam download process, the game has already been installed on your computer. To start playing the game, read the Getting Started section.

Getting Started

  1. Double-click on the Steam application icon. By default this is located in the Applications folder on your computer’s hard drive.

  2. If you are not already signed in, the Steam Login dialog will appear. Enter your account name and password, then select Login.

  3. The Steam application will launch. Select the Library tab.

  4. In the library, highlight Company of Heroes 2 in the list of games on the left-hand side of the window, then select Play.

  5. The Company of Heroes 2 pre-game Options window will appear. Click on the Play button. The game will launch.

  6. After the loading screens, the Main Menu will appear. Select Campaign.

  7. The Begin a New Campaign screen will appear, from which you can adjust the difficulty setting. If this is your first time playing, we recommend you select either Easy or Standard. Select a difficulty setting, then click Begin.

  8. After the opening video, a mission briefing will appear. When prompted, press any key to continue.

  9. Stalingrad, September 1942: the city is under siege. Your troops wait on the banks of the Volga. Follow your commander’s orders as you attack and drive the Germans back.

3

Controls

Company of Heroes 2 requires you to right-click in order to perform many commands. If you are using a Magic Mouse or Trackpad, your secondary click may not be activated by default. For detailed instructions on how to enable secondary click, see Can I play Company of Heroes 2 using my Magic Mouse or Trackpad in the FAQs.

Classic and Grid Hotkeys

In Company of Heroes 2, you can choose between using “Classic” hotkeys and “Grid” hotkeys.

Classic hotkeys are the default option. They’re easy to remember, because the key you need to press often refers to the thing you want to do (for example, you press A to “Attack” or G to “Attack Ground”).

Grid hotkeys are organized close together, so that you can reach them all easily with your left hand. With grid keys enabled, the layout of the hotkeys is always the same as the layout of abilities in the Abilities grid shown in the bottom-right corner of the screen, so by looking at the Abilities grid, it’s easy to know which key to press.

To change the hotkey type, select MenuOptions from the Main Menu, then select the Gameplay tab. On this tab, enable Classic Hotkeys to use classic hotkeys, or disable it to use grid hotkeys.

The controls listed below and in the rest of this manual assume that you are using the classic hotkeys.

Camera

Move camera Move Mouse to edge of screen
Middle Mouse button (hold) + move Mouse
Arrow keys
Zoom in Mousewheel up OR Page up
Zoom out Mousewheel down OR Page down
Rotate and tilt Alt + move Mouse
Reset camera tilt Backspace
Reset camera rotation and zoom Backspace (tap twice)
Move camera to starting position Home

Universal Unit Controls

The hotkeys below are the same for all units. For example, any unit with the “Retreat” command can be ordered to retreat using the T key.

Hotkeys for the unique special abilities of each unit can be found on the Soviet and Wehrmacht hotkey lists.

NOTE: Not all units can use all of the abilities listed below.

Attack move A
Attack ground G
Stop S
Retreat T
Reinforce R
Reverse move U
Enter primary build menu V
Enter secondary build menu B
4

Unit Selection

Infantry
Select all infantry units Command (⌘) + .
Select all idle infantry units Command (⌘) + Alt + .
Select next infantry unit .
Select next idle infantry unit Alt + .
Vehicles
Select all vehicles Command (⌘) + /
Select all idle vehicles Command (⌘) + Alt + /
Select next vehicle /
Select next idle vehicle Alt + /
Engineers/Pioneers
Select all engineers/pioneers Command (⌘) + ,
Select all idle engineers/pioneers Command (⌘) + Alt + , OR Command (⌘) + F1
Select next engineer/pioneer ,
Select next idle engineer/pioneer Alt + ,
Miscellaneous
Select all units Command (⌘) + F2
Select all units currently on screen ;
Select next unit in a group of selected units Tab
Select previous unit in a group of selected units Control + Tab
Clear all selections Escape

General

General
Select Left Mouse button
Give orders (move, attack, etc.) Right Mouse button
Open in-game Pause menu F10 OR Escape
Pause and issue orders (single-player games only) F16 OR Fn + Escape (esc)
Toggle team chat (online games only) Return
Toggle chat to all players (online games only) Shift + Return
Set “Attack here!” signal Command (⌘) + A
Toggle tactical map O
Building Selection
Select production building 1 (HQ) F1
Select production building 2 F2
Select production building 3 F3
Select production building 4 F4
Select production building 5 F5
Groups
Assign selected unit(s) to control group 0-9 Command (⌘) + 0-9
Select control group 0-9 0-9
Move camera to control group 0-9 0-9 (tap twice)
5

Soviet

Buildings
HQ - Regimental Field Headquarters
Combat Engineer Squad E
Conscript Infantry Squad C
Field Infirmary H
Molotov Package M
Anti-tank Grenade Package T
Tier 1 - Special Rifle Command
Scout Sniper Squad S
M3A1 Light Scout Car C
Penal Battalion B
Tier 2 - Support Weapon Kampaneya
M1910 Maxim Heavy Machine Gun H
PM-41 82mm Mortar Squad R
ZiS-3 76mm Divisional Field Gun T
Tier 3 - Tankoviy Battalion Command
M5 Half-track Transport H
T-70 Light Tank N
SU-76M Assault Gun A
Tier 4 - Mechanized Armor Kampaneya
BM-13 Katyusha Rocket Truck R
T-34/76 Medium Tank T
SU-85 Medium Tank Destroyer S
Units
HQ - Regimental Field Headquarters
Combat Engineer Squad
Production Buildings V
Field Defenses B
Repair E
Wire Cutters W
Plant Demolition Charge D
Trip Wire Flares (veteran ability) N
Conscript Infantry Squad
Field Defenses B
Merge M
Throw Molotov Cocktail V
Oorah! H
RPG-43 Anti-tank Grenade E
Trip Wire Flares (veteran ability) N
Tier 1 - Special Rifle Command
Scout Sniper Squad
Hold Fire H
Flare (veteran ability) F
M3A1 Light Scout Car
Overdrive (veteran ability) E
Penal Battalion
Throw Satchel Charge E
Oorah! (veteran ability) H
Trip Wire Flares (veteran ability) N
Tier 2 - Support Weapon Kampaneya
M1910 Maxim Heavy Machine Gun
Sprint (veteran ability) N
PM-41 82mm Mortar Squad
Mortar Barrage B
Fire Smoke Barrage C
Hold Fire H
Flare (veteran ability) F
ZiS-3 76mm Divisional Field Gun
Light Artillery Barrage B
Prioritize Vehicles H
Tracking (veteran ability) I
Tier 3 - Tankoviy Battalion Command
M5 Half-track Transport
Overdrive (veteran ability) E
T-70 Light Tank
Prioritize Vehicles H
Recon Mode R
Crew Repair V
Secure Mode (veteran ability) C
SU-76M Assault Gun
Light Artillery Barrage B
Prioritize Vehicles H
Tracking (veteran ability) I
Tier 4 - Mechanized Armor Kampaneya
BM-13 Katyusha Rocket Truck
132mm Rocket Barrage B
Creeping Barrage (veteran ability) C
T-34/76 Medium Tank
Ramming Maneuver R
Prioritize Vehicles H
Secure Mode (veteran ability) C
SU-85 Medium Tank Destroyer
Focused Sight F
Prioritize Vehicles H
Tracking (veteran ability) I
6

Wehrmacht

Buildings
HQ - Kampfgruppe Headquarters
Pioneer Squad E
MG42 Heavy Machine Gun Team H
Escalate to Battle Phase 1 B
Escalate to Battle Phase 2 G
Escalate to Battle Phase 3 T
Tier 1 - Infanterie Kompanie
Grenadiers G
GrW 34 Mortar Team R
Sniper S
Tier 2 - Leichte Mechanized Kompanie
Panzergrenadiers G
SdKfz 251 Half-track H
SdKfz 222 Scout Car S
Pak 40 7.5cm Anti-tank Gun A
Tier 3 - Support Armor Korps
StuG III Ausf. G Assault Gun S
Flakpanzer IV Ostwind T
Panzer IV Medium Tank V
Tier 4 - Heavy Panzer Korps
Sturmpanzer IV “Brummbär” B
Panther PzKpfw V Medium Tank A
Panzerwerfer 42 Multiple Rocket Launcher W
Units
HQ - Kampfgruppe Headquarters
Pioneer Squad
Production Buildings V
Field Defenses B
Repair E
Wire Cutters W
Field First Aid (veteran ability) M
Tier 1 - Infanterie Kompanie
Grenadiers
Field Defenses B
Fire Panzerfaust F
Rifle Grenade Shot E
Field First Aid (veteran ability) M
MG42 Heavy Machine Gun Team
Fire Incendiary Armor Piercing Rounds (veteran ability) F
GrW 34 Mortar Team
Mortar Barrage B
Smoke Barrage C
Hold Fire H
Counter Barrage (veteran ability) E
Sniper
Hold Fire H
Fire Incendiary Explosive Round (veteran ability) F
Tier 2 - Leichte Mechanized Kompanie
Panzergrenadiers
Bundled Model 24 Grenades E
Field First Aid (veteran ability) M
SdKfz 251 Half-track
Infantry Awareness (veteran ability) N
SdKfz 222 Scout Car
Infantry Awareness (veteran ability) N
Pak 40 7.5cm Anti-tank Gun
Prioritize Vehicles H
Target Weak Point (veteran ability) W
Tier 3 - Support Armor Korps
StuG III Ausf. G Assault Gun
Prioritize Vehicles H
Target Weak Point (veteran ability) W
Flakpanzer IV Ostwind
Blitzkrieg Tactics (veteran ability) B
Panzer IV Medium Tank
Prioritize Vehicles H
Blitzkrieg Tactics (veteran ability) B
Tier 4 - Heavy Panzer Korps
Sturmpanzer IV “Brummbär”
Bunker Busting Barrage (veteran ability) B
Panther PzKpfw V Medium Tank
Prioritize Vehicles H
Blitzkrieg Tactics (veteran ability) B
Panzerwerfer 42 Multiple Rocket Launcher
15cm Rocket Barrage B
Counter Barrage (veteran ability) C
7

Tutorials

If you want to charge straight into the battle, the campaign provides an excellent introduction to the game. However, Company of Heroes 2 also includes several other forms of in-game help in the Tutorials menu (Main MenuTutorials).

The Tutorials menu contains the following tabs:

Missions

This tab contains two specially-designed training missions: the tutorial mission and the training grounds mission.

The tutorial mission guides you through the basics of controlling your troops. To play the tutorial mission, select Launch Mission.

The training grounds mission is a sandbox battle designed to let you explore the different units and tactics available in the game. To launch the training grounds mission, select Training Grounds, then click Launch. If you want to change your army, click on the medal icon before launching the mission.

Videos

This tab contains a number of tutorial videos that introduce basic game concepts.

Game Tips

This tab lists quick and helpful tips on battlefield tactics, arranged by subject.

Camera

There are several ways to move the camera:

  • Move the cursor to the edge of the screen;
  • Hold the Middle Mouse button and move the mouse;
  • Use the Arrow keys on the keyboard.

You can also move the camera instantly to a location by clicking a location on the mini-map or double-clicking on a location on the tactical map.

To rotate and tilt the camera, hold the Alt key and move the mouse.

To zoom in and out, scroll the Mouse wheel or use the Page Up and Page Down keys.

To reset the camera’s tilt, press the Backspace key. To reset the camera’s rotation and zoom as well, press the Backspace key twice.

True Sight

Company of Heroes 2’s True Sight system means that your vision on the battlefield is realistically restricted to what your soldiers would be able to see.

You won’t be able to see areas that you haven’t explored yet. Areas that you have explored but aren’t currently in your troops’ line of sight will remain visible, but you won’t see any changes or enemy movements there. Your soldiers also cannot see past objects taller than eye-level, such as buildings.

Line of sight can change quickly during the battle: temporary effects such as smoke will block your vision and you can destroy obstacles such as trees and walls to reveal the terrain behind them.

Enemy soldiers could be lying in wait in unobserved terrain, so make sure to scout ahead and avoid areas where you could be ambushed.

8

Game Modes

Campaign

The campaign comprises 14 missions retracing events on the Eastern Front during World War II. You command the Soviet troops fighting against the German invaders.

To access the campaign, select Campaign from the Main Menu.

Theater of War

The Theater of War mode is a collection of scenarios, challenges and battles for single-player and co-op multiplayer games.

Scenarios challenge you to complete a set of specific objectives.

Challenges give you a small set of objectives to complete against the odds or in unusual circumstances.

Battles are straightforward skirmishes. You’ll be challenged to take and hold victory points around the map or destroy your opponent’s base buildings to win the battle.

To access these missions, select Theater of War from the Main Menu.

Online & Skirmish

Online & Skirmish games allow you to set up quick or custom battles against human or AI players, or a mix of the two.

To access these battles, select Online & Skirmish from the Main Menu.

Online and skirmish battles challenge you to either capture and hold victory points or destroy all of your opponent’s base buildings to win. To choose the victory conditions for the battle, click the Options button before beginning the match and set the Win Condition to your preferred option:

Victory Point – you win when your enemy’s victory point counter runs out or when you destroy all of their base buildings.
Annihilation – you win when you destroy all of your enemy’s base buildings.
No Win Condition – the battle will continue indefinitely, until you choose to quit it.

Map

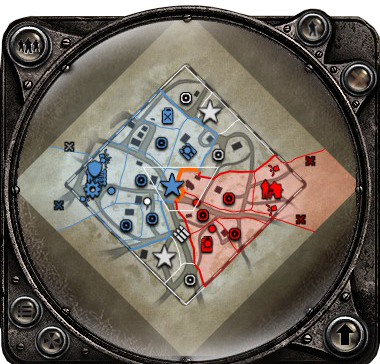
Image of mini-map

The mini-map is displayed in the bottom-left corner of the screen during a battle. It shows the layout of the terrain, including the territory controlled by you (shown in blue) and that controlled by your enemy (shown in red). It also shows the positions of territory points and any visible units.

Flashing icons on the mini-map indicate a new event has occurred, such as an enemy unit being revealed.

You can use the mini-map to give and queue orders. With a unit selected, right-click on a location to order the unit to move there, or right-click on a territory point to order the unit to capture it. Hold down the Shift key while clicking to queue multiple orders.

Tactical Map

To open the full tactical map, press the O key. This map shows a larger version of the mini-map, which also details the rewards you will earn for capturing each territory point.

Like the mini-map, you can use the tactical map to give and queue orders. Click on a unit icon on the map to select that unit, and right-click on a location to give move or capture orders.

NOTE: The tactical map is only available in battles. You cannot access it during the campaign or Theater of War scenarios and challenges.

9

Game Screen

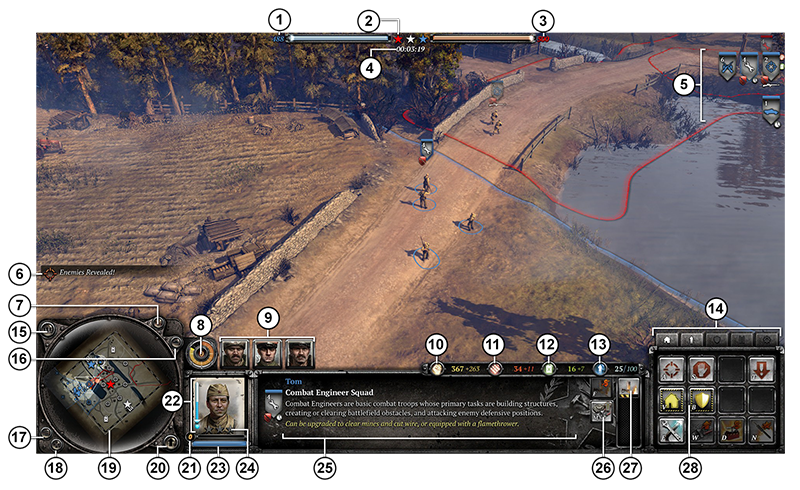
The game screen provides a wealth of useful information. To find out what an item on screen means, place the mouse cursor over it until a tooltip appears.

Image of game screen

1 Allied victory point counter
2 Victory points held
3 Enemy victory point counter
4 Time elapsed
5 Global unit control
6 Event notifications
7 Next idle infantry button
8 Command points
9 Commander abilities
10 Manpower
11 Munitions
12 Fuel
13 Population cap
14 Building selection
15 Player list
16 Next idle vehicle button
17 Menu button
18 Attack here signal
19 Mini-map
20 Tactical map button
21 Squad kill count
22 Squad temperature
23 Squad health
24 Squad veterancy rank
25 Information panel
26 Upgrades
27 Production queue
28 Abilities grid

Global Unit Control

In the top-right corner of the screen, you’ll see icons for each of your deployed units.

Click on any unit icon to select that unit. Double-click to move the camera to the unit.

Symbols under each unit icon indicate that unit’s status:

Clock - the unit is currently inactive.
Crosshair - the unit is engaged in combat.
Shield - the unit is in cover (green = heavy, yellow = light, red = negative).
Sniping - the unit is camouflaged.
Thermometer - the unit is in danger of freezing.
Weapon/item - the unit has been upgraded with special weapons or equipment.

10

Units

Squads

Your infantry units are organized into squads of up to six individual soldiers. As a squad takes damage, the number of soldiers in it will decrease.

Vehicle units contain only one vehicle each.

Selection

There are a number of ways to select a unit:

  • Click the unit or one of the members of the squad on the screen;
  • Click and drag a selection box around the unit;
  • Click the unit’s icon in the global unit control in the top-right corner of the screen;
  • Click the unit’s icon on the tactical map.

Movement

To move a selected unit, right-click on the point to which you want it to move.

Queuing Orders

You can set out a series of checkpoints by holding the Shift key and right-clicking on each point in turn. The unit will move to each point in order. This can be used to help units avoid dangerous areas or stick close to fires during cold weather.

You can order units to perform actions one after the other in the same way: just hold down the Shift key while you give orders. This can be particularly helpful to order one squad to capture multiple territory points at the start of a battle by holding down the Shift key and right-clicking on each point in turn. The squad will then attempt to capture the points one at at a time.

Vaulting

Your infantry squads can vault over low objects such as walls, allowing you to quickly move them in and out of cover. To vault an obstacle with a selected squad, hold the mouse cursor over the obstacle until a yellow arrow appears, then right-click.

Some obstacles, such as barbed wire, cannot be vaulted.

Facing Order

The direction that your units are facing can be important: weapons with a firing arc must be positioned facing the enemy, and vehicles are more vulnerable when their sides or rears are exposed.

To order a selected unit to face a particular direction, click and hold the Right Mouse button and drag the mouse in the direction you want the unit to face. An arrow will appear on screen: when it is facing the right direction, let go of the Right Mouse button to issue the order.

11

Attacking

To order a selected unit to attack an enemy, right-click on the enemy. Most units will fire automatically at any enemies within range.

Right-clicking will order the unit to attack using its normal weapons, but units also have special abilities.

Range

Units have a maximum range. If a target is outside a unit’s range, the unit will need to move closer before it can attack.

Most infantry units are more accurate at closer ranges. However, the effectiveness of a unit at different ranges depends on the type of weapon it uses: units with rapid fire weapons such as submachine guns are more effective at short range, whereas soldiers with rifles remain effective at longer ranges.

Some units, such as mortar squads, also have a minimum range. They will not be able to attack anything within the minimum range.

Firing Arc

Larger weapons, such as heavy machine guns and anti-tank guns, may need to be set up before they can be used, and have a restricted firing arc. When you select a unit, its firing arc is shown on the screen. The weapon is only able to attack enemies within the indicated area.

Use facing orders to ensure that the unit is facing the right direction to attack the enemy.

12

Groups

You can organize one or more units into a group, which allows you to more easily select them using the number keys on your keyboard.

To form units into a group, select them, hold down the Command (⌘) key, and press a number button (0-9). Once you’ve assigned a number to a group, you can quickly select that group by pressing the corresponding number key.

Veterancy

Units gain experience as they fight and kill enemies. When a unit gains enough experience, it will gain a veterancy rank (indicated by stars on the unit’s icon).

Each unit has three veterancy ranks and each rank will improve its effectiveness or unlock a new ability. To see what effect each rank has, select a unit and place the mouse cursor over the stars on its portrait in the information panel at the bottom of the screen.

Upgrades

Units can be upgraded with special weapons or equipment. There are two ways to upgrade units:

  • Infantry squads can pick up weapons left lying on the battlefield. With a squad selected, right-click on a weapon to pick it up.
  • Some units have upgrades that you can purchase using munitions. When you select a unit, any available upgrades will appear as upgrade buttons on the information panel at the bottom of the screen. Click a button to purchase the corresponding upgrade. Units can only be upgraded in this way while in your own territory.

When they die, squads with special weapons may drop them. Avoid leaving weapons scattered around the battlefield, or your enemy may pick them up and use them against you.

13

Reinforcing Squads

Each infantry squad consists of a small number of individual soldiers. As the squad takes damage, soldiers will be killed.

Damaged squads can be reinforced with new soldiers to keep them at full strength. There are two ways to reinforce squads:

  • When a squad is near a base building or a half-track vehicle, select the squad and click the Reinforce button (hotkey: R) in the Abilities grid to restore one unit to the squad. Click multiple times to queue up reinforce orders to replace all missing units. If you’re playing as the Wehrmacht, you can also reinforce your squads near a bunker with the command post upgrade.
  • If you’re playing as the Soviets, you can merge conscript squads with other infantry squads to reinforce them. To do so, select a squad of conscripts, click the Merge button (hotkey: M) in the Abilities grid, then left-click the squad you want to reinforce. Enough soldiers from the conscript squad will move into the target squad to reinforce it.

Reinforcing a squad is much cheaper than deploying new units, and the squad will retain any upgrades or veterancy ranks it has already earned.

Retreating

Sometimes retreat is the only option to keep a squad alive.

To order a selected squad to retreat, click the Retreat button (hotkey: T) in the Abilities grid. The squad will run back to your headquarters.

While the squad is retreating, you will be unable to control it. However, as it’s moving quickly, it is much less vulnerable to enemy fire.

Combat Engineers and Pioneers

Combat engineers (Soviet) and pioneers (Wehrmacht) are special units capable of constructing production buildings and field defenses, as well as repairing structures and vehicles.

Don’t underestimate their importance: they may not be effective in combat, but using their abilities effectively can mean the difference between victory and defeat.

Production buildings are used to deploy new units to the battlefield. For more information, see The Base. To build production buildings, click the Production Buildings button (hotkey: V) in the Abilities grid.

Field defenses, including bunkers, sandbags and razor wire, can provide cover to your own troops or hinder enemy troops. They can offer a significant tactical advantage in a battle. To build field defenses, click the Field Defenses button (hotkey: B) in the Abilities grid.

Your engineers and pioneers can also repair damaged vehicles, buildings and other structures, including bridges. To repair a damaged structure or vehicle, click the Repair button (hotkey: E) in the Abilities grid, then left-click the damaged object.

14

Vehicles

Vehicles can be used to support your infantry troops: armored vehicles are able to absorb most infantry fire, but are vulnerable to attack from mines, artillery and anti-tank weapons.

Vehicles’ armor is weaker at the sides, and especially weak at the rear. Flank enemy vehicles to attack them more effectively, and avoid exposing your own vehicles’ sides and rear to the enemy.

Damaged vehicles can be repaired by your engineers or pioneers. You can also repair a vehicle at a repair facility, if there’s one on the map.

If a vehicle is very badly damaged, your soldiers may abandon it. You can recrew an abandoned vehicle by selecting an infantry squad and right-clicking the vehicle. Avoid leaving abandoned vehicles around the battlefield, or your enemy may recrew them and use them against you.

Transporting Troops

Some vehicles, such as half-tracks, can be used to transport infantry units. To load a selected squad into a vehicle, right-click on the vehicle. To unload them, select the vehicle and click the Unload Selected Troops button (hotkey: D) in the Abilities grid.

While in a vehicle, your troops will be protected from enemy fire and cold weather.

Reversing

Some vehicles turn very slowly, so in some situations, it may be quicker to reverse than to turn around. Reversing also avoids exposing a vehicle’s weaker side and rear armor to the enemy.

To reverse a selected vehicle, click the Reverse Move button (hotkey: U) in the Abilities grid and left-click on your destination.

Vehicle Criticals

Vehicles can be damaged in specific ways, with particular penalties for each type of damage. If a vehicle is damaged in this way, an icon will appear over it:

Crew Shock Crew shock The vehicle cannot move or fire for a few seconds.
Driver Injured Driver injured The vehicle cannot move for a few seconds.
Engine Damage Engine damage The vehicle’s top speed and rotation rate are reduced until it is repaired.
Engine Overheated Engine overheated The vehicle’s top speed is reduced for a few seconds.
Gunner Injured Gunner injured The vehicle’s main gun is disabled for a few seconds.
Heavy engine damage Heavy engine damage The vehicle’s top speed and rotation rate are greatly reduced until it is repaired.
Immobilised Immobilized The vehicle cannot move until it is repaired.
Main gun destroyed Main gun destroyed The vehicle’s main gun is disabled until the vehicle is repaired.
Top gunner killed Top gunner killed The vehicle’s mounted gun is disabled until the vehicle is repaired.
Vision blocked Vision blocked The vehicle cannot fire for a few seconds.
15

Special Abilities

All units have special abilities that can be used in addition to their standard attack.

When you select a unit, its special abilities are shown in the Abilities grid in the bottom-right corner of the screen. Left-click on an ability to use it, and left-click on a target if required.

Some units unlock new abilities as they gain veterancy ranks or are upgraded, or when you buy upgrade packages at your HQ.

Many abilities have a munitions cost. Place the mouse cursor over an ability button to see details of its effect and cost.

Many abilities also have a cooldown period: this means that after using an ability you must wait a short time before you can use it again.

Special Weapons

There are a large number of special weapons and abilities in Company of Heroes 2, but below are some tips on the more common and useful weapons in your arsenal:

Flamethrowers - You can upgrade your engineers or pioneers to carry flamethrowers. Flamethrowers are extremely effective against infantry: squads caught in the flames will succumb in seconds. Flamethrowers also ignore cover and are effective against units garrisoned in buildings. They can be used to melt ice on cold-weather maps: just issue an “attack ground” order on a patch of ice.

Molotov cocktails - You can buy the Molotov package at the Soviet HQ. This allows conscripts to throw Molotov cocktails, which are extremely effective against infantry. As these are a thrown weapon, they can also be used to attack units in cover or garrisoned in buildings.

Grenades - Many infantry units can throw grenades. Anti-personnel and fragmentation grenades are very effective against infantry squads, and can be thrown over cover or into buildings. They’re a great way to free pinned units that cannot attack the enemy directly. Anti-tank grenades allow your infantry to take on vehicles.

Smoke grenades - Smoke breaks line of sight, so it can be used to disrupt enemy fire (if they can’t see you, they can’t shoot you!). You can use it to escape suppressing fire or reposition your squads without the enemy seeing.

Mines - Your engineers or pioneers can lay mines. They’re a great way to defend positions from enemies without risking your troops, especially if you don’t have the resources to field more expensive anti-tank weapons.

Mortars - Mortar squads are a great form of artillery early in the game, when resources are scarce: they’re much cheaper than heavier artillery weapons, but are still very effective against buildings and vehicles.

Tanks - Heavy armored vehicles are extremely tough, and are immune to most infantry fire. They’re also able to traverse the battlefield very quickly.

16

Resources

There are three key resources in Company of Heroes 2: manpower, munitions and fuel.

Manpower is used to deploy new infantry squads and vehicles, and build production buildings.

Munitions are used to activate special abilities and upgrade units.

Fuel is used to deploy new vehicles and build production buildings.

Your current supply of each resource and the amount you are generating per minute is shown on the information panel at the bottom of the screen.

Generating Resources

When you begin a game, you generate manpower at a high rate per minute, and munitions and fuel at a low rate per minute.

Your manpower generation rate decreases as you build new units, and will increase again as you lose units.

You can increase your munitions and fuel generation rates by capturing resource points and building fuel and munitions caches.

Territory Points

Territory points are strategic sites located around the battlefield.

Capturing a territory point grants you a specific benefit, such as generating additional resources. A point’s effect depends on its type (see below).

When you capture a point, you also gain control of the territory around it, as shown by the colored shading on the mini-map and tactical map.

To capture a point, move an infantry squad into its radius, which is indicated by a circle on the ground around the point. A timer will appear over the point: when the timer is full, you will gain control of the point. You can only capture a point once you’ve cleared its radius of enemy units.

There are several types of territory point:

  • Resource points
    • Standard point
    • Munitions point
    • Fuel point
  • Victory points
  • Other points
    • Field hospital
    • Repair facility
    • Watchtower
17

Resource Points

Standard territory points, munitions points and fuel points all generate a certain amount of munitions and fuel per minute:

  • Standard points generate a small amount of both munitions and fuel;
  • Munitions points generate a large amount of munitions only;
  • Fuel points generate a large amount of fuel only.

Your engineers or pioneers can build a fuel cache or munitions cache on a standard territory point to increase the amount of fuel or munitions it generates. Caches cannot be built on fuel or munitions points.

Resource caches also make the point less vulnerable to enemy attack, as the cache must be destroyed before the point can be captured.

In order to gain the benefit of a resource point, it must be connected to your HQ by a continuous line of territory. If it is not, the point will not generate any resources. If an area of territory is not connected to your HQ, it will flash on the mini-map.

Victory Points

Unless the win condition has been set to Annihilation, you must capture and hold victory points to win battles in Theater of War and Online & Skirmish battles.

Each side has a victory point counter, shown at the top of the screen. When you control more victory points than your opponent, their victory point counter will slowly drain. When your opponent controls more points than you, your victory point counter will drain. When one side’s victory point counter reaches zero, they lose the battle.

Other Points

On some maps, you will also encounter repair facilities, field hospitals and watchtowers, which have specific benefits. Place your mouse cursor over a captured point on the map to see a description of its effect.

18

The Base

When you start a battle, you begin with a small number of base structures, including a headquarters.

You can build more structures using engineers or pioneers. To do so, select an engineer or pioneer squad and click the Production Buildings button (hotkey: V) or the Field Defenses button (hotkey: B).

Each additional production building you construct allows you to deploy additional types of unit.

Some structures cannot be built right away: for example, you cannot build the third Soviet production building until you have built one of the first two, and you cannot build the Wehrmacht production buildings until you have bought the corresponding battle phase upgrades from the HQ.

To construct a building more quickly, assign multiple engineer or pioneer squads to it.

Deploying Units

New units are deployed from your production buildings, including the headquarters. To see the units you are able to deploy, select a production building. The units that can be deployed from that building will then be shown in the Abilities grid.

There are several ways to select your production buildings:

  • Click on a building on the map;
  • Click on a building’s tab above the Abilities grid in the bottom-right corner of the screen;
  • Use the hotkeys (F1-F5).

To deploy a new unit, click on one of the unit buttons in the Abilities grid. You can click multiple times or on multiple buttons to queue up deployment orders: each unit will be deployed in turn. To cancel a deployment order, click on the unit’s icon in the production queue to the left of the Abilities grid.

Rally Points

By default, a newly deployed unit will move directly to the building from which it was produced. If you prefer, you can set a custom rally point for a production building, so that any units deployed from it will move to a point on the map that you specify.

To set a new rally point for a production building, select the structure and right-click on a position on the battlefield.

Population Cap

Your army has a population cap, limiting the maximum number of units you can control at any one time. The population cap is shown above the information panel, on the right of the resource counters.


Different units have different population costs. Hover over a unit button in the Abilities grid to see its cost in resources and population.

Once you reach your population cap, you will not be able to build any more units until some die.

19

Tactics

Cover

Cover is one of the most important tactical considerations in Company of Heroes 2. It’s a measure of how well protected your infantry squads are by their surroundings. A squad hidden behind a wall is in good cover, and will be harder for the enemy to hit, whereas a squad in the open is an easy target and will take more damage from enemy fire.

If your squad is particularly exposed, for example standing in the middle of a road, they may be in negative cover, which makes them especially vulnerable to enemy fire and suppression.

When a squad is in cover, a shield icon will appear on the squad’s icon indicating the level of protection:

Green - heavy cover Your squad is well protected and much less vulnerable to enemy fire and suppression.
Yellow - light cover Your squad is partially protected and a little less vulnerable to enemy fire and suppression.
No cover Your squad is neither protected nor exposed.
Red - negative cover Your troops are exposed and vulnerable to enemy fire and suppression.

Most cover is directional: it will only protect your squad if the cover is between them and their attackers. For example, a wall will only provide cover in one direction, so you must keep the wall between your squad and the enemy to gain the benefit of the cover. Try to avoid letting the enemy flank squads in directional cover. Some cover, such as a crater, will protect a squad from all directions.

Cover is also dynamic: many cover-providing structures can be destroyed by combat, and cover can sometimes be created by battlefield debris, including destroyed vehicles and craters from artillery fire. Some units also have the ability to create objects that can provide cover, for example conscripts’ ability to build sandbags.

Cover is ineffective against certain weapons: for example, artillery can fire over it, and grenades can be thrown over it.

Garrisoning

You can garrison infantry squads inside buildings and other structures. While garrisoned, your squads are far less vulnerable to enemy fire and will be able to see further (the taller the building, the further they’ll be able to see). Although they’re well defended from normal fire, they may still be vulnerable to certain weapons, such as grenades, which can be thrown into a building.

To garrison a selected squad in a structure, right-click on the structure. To order them to leave the structure, select the structure and click the Unload Selected Troops button (hotkey: D).

If the structure has multiple exits, you can avoid exposing your squad to the enemy by ordering it to leave by a specific exit. To do so, select the squad by clicking on its icon in the global unit control and right-click on the area you’d like them to move to. The squad will leave the building by the exit nearest to that area.

20

Camouflage

Some units can remain hidden from the enemy using camouflage. Snipers are able to do so by default: they will automatically enter camouflage whenever they’re in cover.

Certain other units can be upgraded to use camouflage, and during a blizzard, any infantry unit will be camouflaged when in deep snow.

While a unit is camouflaged, it is invisible to the enemy. A white sniping icon will appear below the unit’s icon, and the unit itself will turn translucent.

Firing reveals a unit to the enemy, so it’s best to hold fire until you’re ready to reveal your position. Snipers can be ordered to hold fire by clicking the Hold Fire button (hotkey: H) in the Abilities grid.

Suppression & Pinning

Fire from a heavy machine gun, a strafing aircraft or certain unit special abilities can be used to suppress and pin infantry squads.

If a squad is exposed to such fire for too long, it will be suppressed (indicated by a yellow triangle icon above the squad): squads in better cover take longer to be suppressed than those in poor cover. While a squad is suppressed, its movement is slowed and its accuracy decreased.

If a squad remains suppressed, it will eventually become pinned (indicated by a red triangle icon). A pinned squad cannot move or attack. Its only option is to retreat, unless another squad can break the suppressing fire.

Initially, a suppressed or pinned squad is less vulnerable to enemy fire, but this wears off after a while, so it’s vital to move them away from fire if possible.

Any other infantry squads near a suppressed or pinned squad are more likely to become suppressed themselves.

Squads in cover are less vulnerable to suppression and pinning, and squads garrisoned in buildings cannot be suppressed or pinned.

Flanking

Flanking means attacking a unit from the side or rear. This can be used to nullify the effect of directional cover or avoid the firing arc of a weapon.

Flanking is also effective against tanks and vehicles, whose armor is weaker at the sides and rear.

Combined Arms

Mastering combined arms is essential: there is no single unit type that’s effective against every other target. The best armies rely on a mix of different units whose strengths and weaknesses complement each other.

For example, combine a machine gun and a mortar for a lethal combination against infantry: the machine gun can suppress and pin enemy squads, allowing the mortar to obliterate the immobile targets. Add an anti-tank gun to the group, and the combination also becomes effective against armored vehicles.

It’s often possible to upgrade units to make them effective against targets they’d normally be powerless against. For example, some infantry squads can be upgraded with anti-tank weapons. Even so, relying on just one type of unit to combat all others is rarely an effective strategy.

21

The Battlefield

General Winter

During the winters of the Second World War, the temperature on the Eastern Front frequently dropped below -10°C, and could even fall as low as -40°C. The cold often proved to be far more lethal than the enemy, proving that its nickname “General Winter” was well earned.

Cold

On some maps, freezing temperatures will pose a serious threat to your units. Infantry squads exposed to the cold will start to freeze, and eventually die.

When a squad starts to freeze, a blue temperature bar will appear next to the squad’s icon. The bar will drain while the squad is in the cold, and when it empties completely, the squad will die of exposure.

Troops in cover will be less affected by the cold: when a squad is in heavy cover, its temperature bar will no longer drain.

Your troops will warm up when near a fire, in a vehicle, or garrisoned in a building. When a squad is warming up, the temperature bar will turn red and increase. When the squad is fully warmed, the bar will disappear again.

Engineers, pioneers and conscripts can build fire pits to warm up your units on cold-weather maps.

Vehicles and snipers are unaffected by the cold.

Deep Snow

On some maps, you’ll encounter deep snow. When you place the mouse cursor over an area of deep snow, it will turn into a snowflake icon.

Both infantry units and vehicles move more slowly through deep snow.

However, deep snow can also act as camouflage. During a blizzard, any infantry unit will be camouflaged while in deep snow.

Crossing deep snow leaves tracks that will be visible to your enemies and could give away your troops’ positions.

Deep snow can be removed by explosions, such as those from artillery fire.

22

Ice

In cold conditions, bodies of water, such as rivers, may be frozen over, making it possible to cross otherwise impassable terrain.

Ice can be broken by explosions, for example from artillery or grenades, and any units on an area of ice when it is broken will fall into the freezing water and die. Ice can also be melted by units with flamethrowers.

Ice is slowly damaged each time vehicles pass over it, making it easier to break.

Broken ice will eventually refreeze, and will do so more quickly during blizzard conditions.

Blizzards

On cold-weather maps, there is a chance of blizzards occurring.

When a blizzard is due to strike, a stopwatch will appear on the screen counting down to the start of the blizzard. Use this time to protect your troops by having your engineers, pioneers or conscripts build fires or by moving your infantry to shelter.

During a blizzard, infantry units will freeze to death sooner, visibility is reduced, and troops in deep snow will be camouflaged.

Some abilities, such as airstrikes, cannot be used during a blizzard.

Buildings & Obstacles

Buildings and other obstacles on the battlefield can be used by your troops in a number of ways. Your squads can take cover around them, be garrisoned in buildings and vault over low walls.

It’s possible to destroy many of the obstacles you see on the battlefield using explosive weapons, such as grenades and artillery. Destroying obstacles allows you to rob your enemy of cover and hiding places. You can also destroy key strategic locations such as bridges, restricting your enemy’s movement.

Engineers and pioneers can repair some damaged structures, including base buildings and bridges. To repair a structure, select an engineer or pioneer squad, left-click the Repair button (hotkey: E) and left-click the damaged structure.

Fire

Incendiary weapons such as flamethrowers and molotov cocktails create fires on the battlefield.

Infantry units in a fire take very heavy damage.

Smoke

Smoke can be created by smoke grenades or smoke barrages from mortars.

Smoke obscures vision, so it can be used to hide your units’ movements or disrupt enemy fire. It can be particularly useful to allow your troops to move into a flanking position or escape suppression.

23

Battle Strategy

Knowing how to command your troops on the battlefield is only one aspect of Company of Heroes 2. Having a well-developed strategy is also key to winning battles, especially in online games where you’ll be facing off against other players.

The sections that follow introduce a few basic points of strategy in Company of Heroes 2. However, the best way to improve your strategy is to experiment and to watch what other players do online, either by playing against them or watching live games.

You can also visit the Company of Heroes 2 forums, where players from all over the world share and discuss their strategies.

Build Order

One of the most important strategic decisions in a battle is the order in which you deploy new units, upgrade them, and build new production buildings. You earn resources slowly, especially at the beginning of a battle, so wasting them on the wrong purchase could prove a hindrance for the rest of the game.

You don’t have to build every production building or use all the units available to you, so only build what is absolutely necessary for your strategy.

Experiment with different combinations to find which works best for you. Remember that your strategy is likely to vary greatly depending on whether you’re playing as the Soviets or the Wehrmacht, as well as on which commanders and intel bulletins you’re using.

Whatever your build order, make sure you capture territory points early in the game: these will give you the necessary resources to deploy units and construct new buildings.

Loadout

You have a few tools at your disposal to help shape your strategy in battles, including commanders and intel bulletins.

These form your player “loadout”, which you take with you into every battle. You can view and change your default loadout using the player card in the top-right corner of the Main Menu:

  • Click on the weapons case to open your inventory. From here, you can filter your items by type and drag them onto the slots in your loadout to add or replace items in it.
  • Click on the medal icon to change your currently selected army. You have a separate loadout for each army.
  • Click on the arrow icon in the top-left corner of the card to flip the card and view your rank and experience.

Your loadout items include skins and decals, which can be used to customize the appearance of your units, as well as commanders and intel bulletins, which provide strategic bonuses.

All of these items are gained through playing battles. Every time you play, you have a chance of earning “war spoils”, which add items to your inventory. The longer you play, the more you’ll earn.

You have separate items and loadouts for each army: Soviet commanders cannot be used when playing as the Wehrmacht, and vice-versa.

24

Commanders

Commanders give you access to a range of special commander abilities during battles.

You can have up to three commanders in your loadout, but you’ll only be able to unlock and use the abilities of one of them during a battle. At the start of the battle, all three commanders’ icons will appear above the information panel. When you’ve decided which commander you want to use, click on its icon: you’ll then have access to its abilities.

Deciding when to unlock a commander is important: doing so at the start of the battle means you have access to its abilities immediately, but it’s sometimes wiser to wait and see how the battle unfolds, so you know which commander’s abilities will be most useful.

Commander abilities unlock one-by-one as you earn command points during the battle. The command point counter is shown above the top-left corner of the information panel. Each time the counter fills, you earn a command point. It fills slowly but continuously throughout the battle. Each time you construct a building or kill enemy units, the counter fills more quickly.

Intel Bulletins

Intel bulletins provide bonuses throughout a battle, such as increased damage and accuracy for a specific unit. You can have up to three intel bulletins in your loadout, and unlike commanders, you receive the benefit of all three of them during a battle.

Rank

You earn player experience for fighting battles, either in single-player or multiplayer. When you earn enough experience, your rank will increase.

To view your experience and rank, click on the arrow icon in the top-left corner of the player card on the Main Menu.

Online

In addition to fighting co-operative or competitive multiplayer battles, there are a number of other online features in Company of Heroes 2, including leaderboards and watching live games.

Leaderboards

The online leaderboards allow you to compare yourself to other players across the world. There are separate leaderboards for each army and game type. You can view the online leaderboards on the Company of Heroes 2 website:

Company of Heroes 2 Leaderboards

Live Games

You can watch multiplayer games live, giving you the opportunity to pick up tactics from other players online.

To see a list of games that you can watch, select Live Games from the Main Menu.

Steam Workshop

With Steam Workshop, you can download content created by other players, including new maps and vehicle skins.

To view the available content, select Modding Hub from the Main Menu.

25

The Western Front Armies

Company of Heroes 2 – The Western Front Armies is a DLC expansion for Company of Heroes 2 that includes two new armies for multiplayer battles and single-player skirmishes. Play as the Oberkommando West, Germany’s late-war army, or as the US Forces, Eisenhower’s expeditionary corps.

For instructions on how to purchase Company of Heroes 2 – The Western Front Armies, see How do I obtain DLC? in the FAQs.

You can also view the Company of Heroes 2 – The Western Front Armies manual for more information on the new armies and units included in the expansion.

26

Ardennes Assault

Command the US forces in the Battle of the Bulge.

Company of Heroes 2 – Ardennes Assault is a DLC expansion for Company of Heroes 2 that includes a new single-player campaign with 18 dynamic scenarios.

For instructions on how to purchase Company of Heroes 2 – Ardennes Assault, see How do I obtain DLC? in the FAQs.

You can also view the Company of Heroes 2 – Ardennes Assault manual for more information about how to play the expansion.

27

The British Forces

Fight for King and Country with the British Forces.

Company of Heroes 2 – The British Forces is a DLC expansion for Company of Heroes 2 that includes a new army for multiplayer battles and single-player skirmishes.

For instructions on how to purchase Company of Heroes 2 – The British Forces, see How do I obtain DLC? in the FAQs.

You can also view the Company of Heroes 2 – The British Forces manual for more information on the new army and units included in the expansion.

28

Technical Support

Every effort has been made to make Company of Heroes 2 as compatible with current hardware as possible. However, if you are experiencing problems when running Company of Heroes 2, please read on.

The latest version of the FAQs can be found by selecting the FAQs button in the Support tab of the Company of Heroes 2 pre-game Options window (this is the window that opens when you launch the game), or by going straight to the Feral website: http://support.feralinteractive.com

Contacting Feral

If the FAQs and/or updates do not solve your problem, then please feel free to contact us. The following information must be obtained before contacting Feral Technical Support:

  • The error message displayed when the problem occurred (if any).
  • A Company of Heroes 2 Report.txt file. This contains:
    • An Apple System Report of your Mac
    • Any crash logs that exist for Company of Heroes 2
    • A list of the game's contents


All the information required can be obtained by opening Company of Heroes 2 and clicking on the Support tab in the Company of Heroes 2 pre-game Options window. In the Support tab, click on the Generate Report button. Once the report is generated it will appear as a file in your ~/Downloads folder (the “~” symbol refers to your home directory). Now click on the Create Email button. Remember to attach the Company of Heroes 2 Report.txt file to your email.

In your email, please include a brief description of the problem you have experienced with Company of Heroes 2.

email: support@feralinteractive.com

29

Warranty

Please check the warranty information provided by Steam.

Credits

Originally developed by:
Relic Entertainment
Originally published by:
SEGA
Macintosh development by:
Feral Interactive
Macintosh publishing by:
Feral Interactive
30

Explore our website to read news and find our complete range of exciting games, or visit the web store to see our current deals and offers.