BioShock™ Remastered - manual

BioShock RemasteredManual

Enter
x

Navigating this manual

Welcome to the BioShock™ Remastered web manual.

You can use the Contents menu on the left to skip directly to the section you're looking for. Alternatively, click the Enter button to access the manual, and use the Next and Previous buttons to navigate page by page.

Can't find what you're looking for? There's even more information in the FAQs and ReadMe: you can view them using the buttons at the top of the screen.

Warnings & Ratings

Important Health Warning About Playing Video Games

Photosensitive Seizures

A very small percentage of people may experience a seizure when exposed to certain visual images, including flashing lights or patterns that may appear in video games. Even people who have no history of seizures or epilepsy may have an undiagnosed condition that can cause these “photosensitive epileptic seizures” while watching video games.

These seizures may have a variety of symptoms, including lightheadedness, altered vision, eye or face twitching, jerking or shaking of arms or legs, disorientation, confusion, or momentary loss of awareness. Seizures may also cause loss of consciousness or convulsions that can lead to injury from falling down or striking nearby objects.

Immediately stop playing and consult a doctor if you experience any of these symptoms. Parents should watch for or ask their children about the above symptoms—children and teenagers are more likely than adults to experience these seizures. The risk of photosensitive epileptic seizures may be reduced by taking the following precautions: Sit farther from the screen; use a smaller screen; play in a well-lit room; and do not play when you are drowsy or fatigued. If you or any of your relatives have a history of seizures or epilepsy, consult a doctor before playing.

Precautions to take during use

  • Sit a good distance away from the monitor.
  • Avoid playing if you are tired or have not had much sleep.
  • Make sure that the room in which you are playing is well lit.
  • Rest for at least 10 to 15 minutes per hour while playing a video game.
ESRB: M PEGI: 18
© 2002-2017 Take-Two Interactive Software and its subsidiaries. Developed by 2K Boston and 2K Australia. BioShock, 2K Games, the 2K logo, 2K Boston, the 2K Boston logo, 2K Australia, the 2K Australia logo and Take-Two Interactive Software are all trademarks and/or registered trademarks of Take-Two Interactive Software, Inc. in the USA and/or foreign countries. All other marks and trademarks are the property of their respective owners. All rights reserved. Unreal® is a registered trademark of Epic Games, Inc. Unreal® Engine, Copyright 1998-2017, Epic Games, Inc. All rights reserved. Havok.com™ Middle-ware Physics System ©1999-2017 Telekinesys Research, Ltd. All rights reserved. See www.havok.com for more details. Mac and the Mac logo are trademarks of Apple Computer Inc. registered in the U.S. and other countries. Feral and the Feral logo are trademarks of Feral Interactive Ltd.

1

Introduction

Welcome to Rapture

Opportunity awaits.

“I am Andrew Ryan and I’m here to ask you a question: Is a man not entitled to the sweat of his own brow? No, says the man in Washington. It belongs to the poor. No, says the man in the Vatican. It belongs to God. No, says the man in Moscow. It belongs to everyone. I rejected those answers. Instead, I chose something different. I chose the impossible. I chose...

Rapture.

A city where the artist would not fear the censor. Where the scientist would not be bound by petty morality. Where the great would not be constrained by the small. And with the sweat of your brow, Rapture can become your city as well.”

2

Installation

As part of the Steam download process, the game has already been installed on your computer. To start playing the game, read the Getting Started section.

Getting Started

  1. Double-click on the Steam application icon. By default this is located in the Applications folder on your computer’s hard drive.

  2. If you are not already signed in, the Steam Login dialog will appear. Enter your account name and password, then select Login.

  3. The Steam application will launch. Select Library.

  4. Highlight BioShock Remastered in the list of games on the left-hand side of the window, then select Play.

  5. The BioShock Remastered pre-game Options window will appear. Click on the Play button. The game will launch.

  6. When the Main Menu appears select New Game.

  7. You will now be asked to choose your difficulty setting according to your experience level. Select Easy, Medium, Hard or Survivor.

  8. After the opening video, you'll find yourself the lone survivor of a horrific plane crash, treading water amid the wreckage…

3

Controls

You can play BioShock Remastered using either a keyboard and mouse or a gamepad.

The instructions in this manual refer to the default keyboard controls. If you have customized your controls or are using a gamepad, the controls listed here will not apply.

Keyboard

The default keyboard controls are detailed below. You can customize your keyboard configuration by selecting SettingsCustomize ControlsCustomize Keys from the Main Menu.

Movement
Move Forward / Left / Right / Backward W / A / S / D
Crouch C
Jump Space
Misc
Quick Save F10 / Command + S
Quick Load F11 / Command + L
Use E
Play Newest Unread Log T
Use First Aid F
Hint Screen H
Hack V
Mapscreen M

Search Again R
Harvest Little Sister H (while aiming at a Little Sister)
Save Little Sister L (while aiming at a Little Sister)
Equipment 1
Next / Previous Ammo Type Q / B
Reload / Eve Hypo R
Plasmid / Weapon Master Pause Menu Shift
Zoom Weapon Z
Select Weapons 1 - 8
Equipment 2
Fire Plasmid / Weapon Left Mouse Button
Toggle Plasmid / Weapon Mode Right Mouse Button
Next / Previous Plasmid or Weapon Mousewheel Up / Down
Active Plasmid Slots 1 - 6 F1 - F6
4

Gamepad

You can play BioShock Remastered using a dual analog stick gamepad. The diagram on this page is based on a standard controller layout; all gamepads have similar buttons but some may differ in layout from the gamepad shown here. For more information see Can I play BioShock Remastered with a gamepad? in the FAQs.

Gamepad control diagram

Move
Toggle Crouch (click)
Look
Toggle Zoom (click)
Reload Weapon / Use an EVE Hypo / Start Hacking
Interact
Use First Aid

Use First Aid
Jump
Switch Plasmid
Activate Plasmid Selection Menu (hold)
Switch Weapon
Activate Weapon Selection Menu (hold)
Fire Plasmid
Fire Weapon
Change Ammo ← / ↑ / ↓ / →
Status Menu
Pause Menu
5

Weapons

As you progress through the city of Rapture, exploration and events will yield weapons that will help you survive. To fire your current weapon press the Left Mouse Button when in Weapon Mode.

Weapon Switching

As you acquire more weapons, you can easily switch back and forth quickly by using the Mouse Wheel when in Weapon Mode or by using the appropriate number key (1-8). When cycling through weapons, icons will appear at the top of the screen showing which weapons are available and their corresponding number key. You can also choose to pause the game and select which weapon to equip by pressing Shift and bringing up the Weapon\Plasmid Selection Screen. Just click the Left Mouse Button on the target weapon to equip and resume gameplay. Pressing Shift or Esc will also resume gameplay.

Ammo

With the exception of the Wrench, each weapon has three different ammo types – one standard ammo type and then two more powerful ammo types that have specific benefits. For example, the Pistol has standard bullets, Armor Piercing Bullets and Anti-Personnel Bullets. Try out different ammo as each one has its own special uses within Rapture. Use the Q and B keys to change ammo on your current weapon.

Weapon Upgrading

Each weapon can be upgraded twice using Power to the People machines found in the world. Think carefully on your upgrade choice as only one upgrade can be made at each Power to the People machine. Once the upgrade is made, the machine closes permanently. On the plus side, the upgrades are free.

6

ADAM

With the world’s best and brightest scientists together at the bottom of the sea with no constraints, it was only a matter of time until the population made a number of breakthroughs. The defining breakthrough was ADAM. Generated by a deep sea parasite when it attached to a host, the parasite produced new stem cells healing the host. The new stem cells allowed the host to take on external genetic modifications that take over their normal cell structure (like cancer). These genetic modifications ranged from medical cures to pure vanity changes, but they eventually became more militant in nature. The instant genetic modifications of Rapture come in two flavours: Plasmids and Gene Tonics.

Plasmids

Now that you are trapped in Rapture, you must adapt and use Plasmids in order to escape the decaying city. Plasmids actively change or affect the world around you. To fire your current Plasmid press the Left Mouse Button when in Plasmid Mode.

Plasmid Switching

You can have multiple Plasmids equipped at the same time. Cycle through the plasmids you have equipped using the Mouse Wheel when in Plasmid Mode or by using the appropriate Function key (F1-F6). When cycling through Plasmids, icons will appear at the top of the screen showing which Plasmids are available and their corresponding Function key. You can also choose to pause the game and select which Plasmid to equip by pressing Shift and bringing up the Weapon\Plasmid Selection Screen. Just click the Left Mouse Button on the target Plasmid to equip and resume geameplay. Pressing Shift or Esc will also resume gameplay.

7

EVE

Plasmids are powered by EVE – a serum that gives you the power to use them.

If you have no EVE, you cannot use your Plasmids. EVE can be restored through the use of EVE hypos which can be found scattered through Rapture as well as being purchased at Vending Machines. Some food and drink items can also give you small amounts of EVE when consumed.

Plasmid Slots

You begin the game with two open Plasmid slots. Each slot allows you to equip a single plasmid, so use them carefully. Additional slots can be obtained by collecting more ADAM (see Gatherer's Gardens).

Switching Between Weapons and Plasmids

Once you have both a weapon and a Plasmid equipped, you will find that combat will dictate a quick switch between the two more often than not. Switching is easily achieved by simply pressing the Right Mouse Button. For example, if you are currently using your Pistol, pressing the Right Mouse Button will switch to the Plasmid you have equipped. Pressing the Right Mouse Button will switch back to the Pistol. You can also press Shift to pause the game and bring up the Weapon\Plasmid Selection Screen. Simply click on the target weapon or Plasmid.

Gene Tonics

Gene Tonics give you enhanced passive abilities, and come in three different flavors. Many, many Gene Tonics have been developed and it’s your choice how they will best serve you in your time in Rapture.

Physical Gene Tonics
Boost your body’s natural abilities in incredible ways. For example, certain Gene Tonics might make you resistant to specific types of damage or let you naturally process toxins.

Engineering Gene Tonics
Enhance your intellect and dexterity to allow you to carry out delicate tasks like hacking into and bypassing Rapture’s security system.

Combat Gene Tonics
Improve your reflexes and strength to boost your combat skills. For example, some combat gene tonics may increase the damage you can deal with a melee weapon or improve your effectiveness with electrical based attacks.

8

Heads Up Display

1 – Number of EVE Hypos

2 – Number of First Aid Kits

3 – Health

4 – EVE

5 – Ammo Menu

6 – Quest Arrow

Main Menu

Continue
Continue playing a previous game. This option loads the most recent save game.

New Game
Select to start a new game and choose from one of three variations of difficulty.

  • Easy - You're new to shooters.
  • Medium - You've played other shooters.
  • Hard - You've played a lot of shooters.
  • Survivor - Every bullet counts.

Load Game
Allows you to load a previous saved game and resume your adventure in BioShock.

Credits
View the credits for the team that brought you BioShock.

Director's Commentary
Watch Imagining BioShock, a series of videos discussing the creation of the original BioShock.

Museum
Follow a guided tour of ideas that Irrational Games discarded or reworked heavily during the making of the original BioShock.

Additional Content
Play a series of non-story missions in the BioShock Challenge Rooms.

Options
Takes you to the Options menu.

Exit
Exits the game.

9

Getting Help

BioShock is a deep game with a lot of things for you to discover. Throughout the game there will be multiple ways to get help in order to fully experience Rapture.

Adaptive Training
The adaptive training system will remind you about features of the game that you may have missed. If you find the system is telling you about things you already know about, you can turn it off in the Options menu.

What Is This?
Looking closely at an item will trigger the What Is This? prompt. You can bring up the What Is This? help message by pressing the M key. This will give you information on that specific item. You can review these help messages at any time by accessing the Status menu.

Hints
By clicking the Show Hint button on the Status menu or by pressing the H key you can get hints on your current goal. These hints will change depending on how much progress you have made in reaching your current objective.

Rapture

Population of Rapture

The citizens of this forlorn underwater city are unique and often grotesque. Below are the primary classes of the Rapture's remaining population. You will encounter variants of the these citizens as you progress further in your explorations.

Splicers
The citizens of Rapture have taken a horrific turn for the worse, crazed from overuse of Plasmids and Gene Tonics. They are extremely aggressive towards anyone unfamiliar, and should be approached with caution.

Little Sisters and Big Daddies
In addition to the former citizens, an even stranger pair can be found roaming the halls of Rapture: small girls with large syringes can be seen walking the decks. Though they seem vulnerable in this twisted world, they are followed by large protectors in metal diving suits called Big Daddies. You cannot get to the Little Sisters until you deal with the Big Daddy, which is no easy task. But deal with them you must if you want to obtain ADAM from the Little Sisters and survive in Rapture.

10

Exploration

Exploring the world of Rapture is beneficial in many ways. There are many hidden secrets to find and looting the corpses that litter the city is essential for the resources you need to survive.

Items
There are many items that can offer health or EVE boosts upon pick up. Money can also be found in many places allowing you to purchase necessary items from Vending Machines.

  • First Aid Kits - Replenishes your Health.
  • EVE Hypos - Restores EVE.
  • Autohack Tool - Allows you to instantly succeed in any hack

Diaries
Diaries can be found throughout Rapture. Diaries are audio messages left by the citizens of Rapture. Some diaries give you information critical to your progress (the game helpfully identifies these with a golden glow). Other diaries simply help you to understand what happened to this once great city or give you clues to hidden secrets.

Security

Rapture is full of machines programmed to provide airtight security.

Cameras
There are cameras placed everywhere, constantly looking for intruders. If a camera spots you, it will sound a warning tone. If you stay in its sight long enough for it to identify you, it will sound the alarm, summoning one or more Security Bots. Alarms will time out (a counter will show you how much time remains) but the security system will keep sending bots as long as the alarm is active.

Turrets
The recent military activity has left many automated Turrets throughout the decks that are still active when confronted by an intruder. These machines are often deadly but surprisingly can be used to your advantage if you can get close enough to hack them. Be careful though, the turret should be disabled before attempting the hack. A number of Gene Tonics and Plasmids were developed to help people circumvent the Security system in a variety of ways.

11

Character Growth

ADAM and the Little Sisters

ADAM is the lifeblood of Rapture. With it, more and more Plasmids and Gene Tonics can be 'spliced' (integrated into your genetic make-up). If you are going to survive in Rapture, you will need to splice as many Plasmids as you can. Unfortunately, the ADAM can now only be found within the Little Sisters who roam the halls of Rapture, recycling ADAM from corpses under the watchful eye of the Big Daddies. Using long syringes, they drain blood from the bodies and then drink it to recycle the ADAM.

The only way to get a Little Sister is through the Big Daddy. If you can defeat him, you will have to choose how to deal with the Little Sister. You can Harvest the ADAM from her, a dangerous process that risks her life, or you can Rescue the Little Sister by killing the parasite inside her that enables her to process ADAM. You will be able to extract some ADAM from this parasite, but not as much as if you had harvested the ADAM directly. Nothing is free in Rapture and even this choice has a cost.

If you do not collect and spend ADAM, the game can get extremely difficult. If you have failed to collect ADAM from Little Sisters on earlier levels you can return to those levels at any time to tackle the Big Daddies.

Once you have acquired some ADAM, you can use it in any of the Gatherer's Garden machines found throughout Rapture.

Researching Rapture's Inhabitants

Another significant source of character growth is through researching the inhabitants of Rapture using the Camera. During your adventure in Rapture, you may come across a special research camera that the law enforcement of the city used to learn the abilities of people who had spliced a lot of plasmids. You can use this camera to take photos of the people and security elements. The camera will rate your photograph and collect data on the enemy. When the camera has learned something, you will be granted bonuses like increased damage versus those enemies or even hidden Gene Tonics! The more photos you take, the quicker you will get the rewards.

The research camera is a significant source of character growth that could be the difference between death and survival.

12

Machines

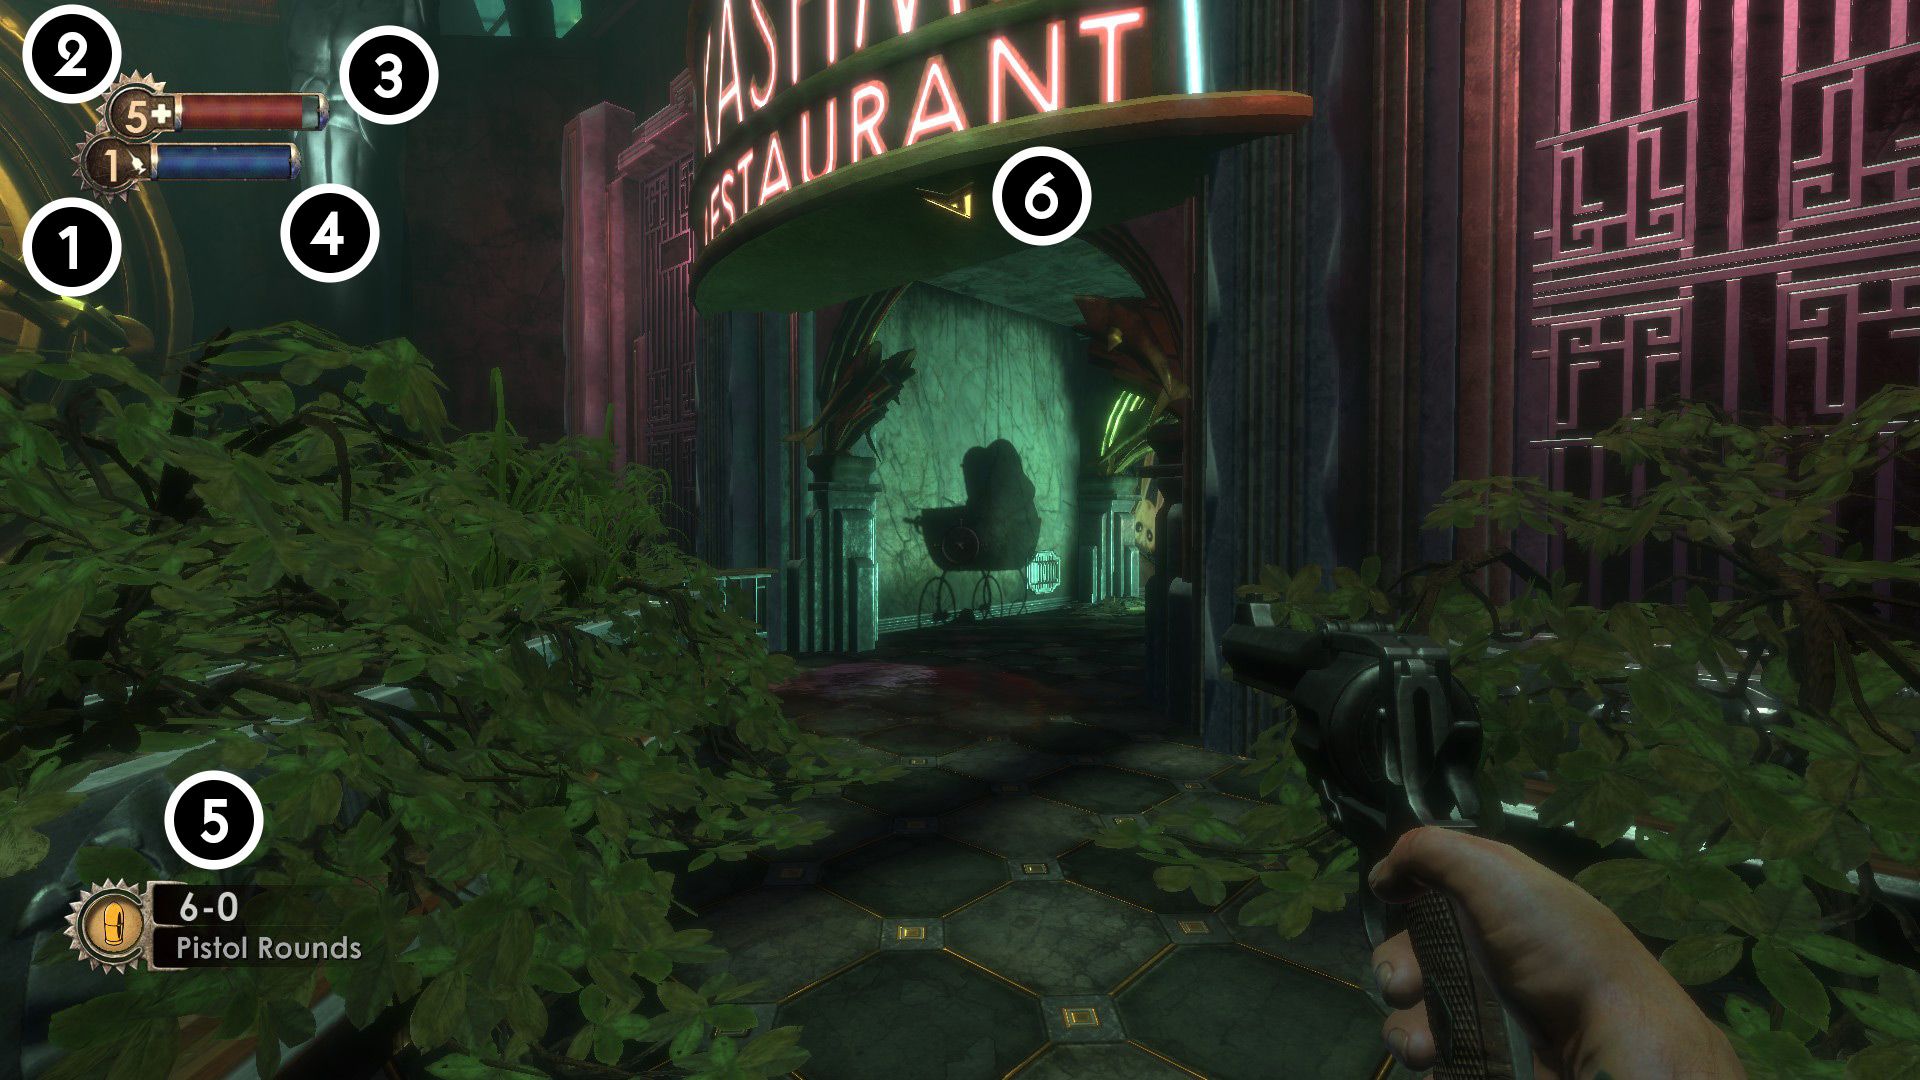
There are a number of machines in Rapture that offer invaluable services or resources.

Gene Banks
Gene Banks are stations that allow you to reconfigure your equipped Plasmids and Gene Tonics. It will show all the Plasmids and Gene Tonics you have collected until that point and allow you to choose which are equipped or not. Unequipped Plasmids and Tonics are kept in storage for later retrieval at any other Gene Bank.

Gatherer's Gardens
These machines take ADAM and can be used to purchase more Plasmid or Gene Tonic slots, to increase your maximum Health or maximum EVE, or even to acquire new Plasmids and Gene Tonics.

Vending Machines
These machines are full of resources for you to purchase such as ammunition, First Aid kits and EVE hypos. Vending Machines can also be hacked, which will give you discounted prices on the available items and even open up special items for sale.

Ammo Banditos
These are ammo-only Vending Machines.

Vita-Chambers
These chambers will revive you if are ever killed within Rapture. There are usually a couple of them in each area.

Bot Shutdown Panels
These can be used to deactivate security bots that have been triggered by an alarm. Once shutdown, bots can be hacked to become friendly to the player.

Health Stations
Health Stations are where you can replenish your health completely - for a price. If you hack a health station, you can get your health filled for a lower price and it will damage any aggressor who uses that machine.

Power to the People Machines
These allow you to upgrade your weapons. These upgrades are free but each machine will only give one upgrade. Once you have chosen your upgrade, the machine closes permanently.

U-Invent Machine
These stations allow you to craft new items from the odds and ends you find throughout Rapture. Glue, rubber hoses and screws are just some of the materials you can collect that can be used to create ammo, hacking tools and even Gene Tonics. Most of these items can only be acquired through the U-Invent Machines.

13

Pause Menu

At any time you can bring up the Pause menu by pressing Esc. Here you can view how much money and ADAM you currently have, as well as see how many Little Sisters are left in the current level. Other options while in the Pause menu include:

Resume
Resumes the current game.

Save
Saves your game progress at the current point. Note that you can save anywhere at anytime. The game will also autosave after loading an area.

Load
Load a previously saved game.

Options
Takes you to the Options menu.

Quit to Main Menu
Leave the current game and access the main menu.

Quit to Finder
Quit the game and return to the Finder.

Status Menu

You can access the Status menu by pressing the M key. The Status menu has a number of tabs which can be selected by clicking on the appropriate box in the bottom right hand corner. The tabs in the Status menu are:

Map
This tab shows a map of the current level. You can go directly here by pressing the M key. The map shows your position and the location of your current goal, if known. You can zoom out from your current position in the map by clicking the corresponding buttons.

Goals
The Goals tab shows a complete list of your current goals. When you have multiple goals that you could be working on, you can switch which goal is active here by selecting one with the Left Mouse Button. Goals that currently can't be worked on cannot be made active.

Messages
The Messages tab allows you replay any radio messages you've heard or diaries that you've picked up.

Help
The Help tab organizes all relevant help messages and is an invaluable resource for information about many of the game systems and items.

14

Hacking

With all the machinery and brilliant minds in Rapture, it's not surprising that someone eventually figured out how to reprogram the machines with Hacking. By successfully redirecting the circuit flow, you can change the current state of the machine. The ability to Hack is present on almost all the machines found in Rapture. Hacking can open locked safes, and can even be used to reprogram the security system to view you as a friend, and your enemies as the intruders to be attacked. If a machine can be Hacked, a prompt will appear when you are next to the machine. Pressing the V key will bring you to the Hacking menu that will allow you to evaluate the difficulty of the Hack as well as whether you want to Buyout or use an Autohack Tool to complete the hack (See below).

How To Hack?

During the Hack, the object is to redirect the circuit flow by uncovering tiles and swapping the pipes you need to move the circuit flow to the exit tile on the board. Watch out for hazard pieces that can increase the speed of the circuit fluid, cause an electrical overload, or even sound a security alarm. The benefit of succeeding is that you gain the benefits for free, but the risk of physical damage is high.

If you are finding Hacking is getting very difficult, it is time to spend your ADAM to upgrade your Engineering track with more slots or to purchase more engineering tonics.

Hacking Buyout
Hacking can also be achieved by paying a premium price. You can spend your money to override the machine. The more difficult the hack the more money it costs. Splicing Engineering Gene Tonics can reduce the buyout costs.

Autohack Tool
Finally, if you are lucky, you can find an Autohack Tool that immediately hacks the machine with no issues. When at the hacking evaluation screen click on the Autohack button to immediately succeed at the hack with no risk. Autohack Tools are used up in the process.

15

Technical Support

Every effort has been made to make BioShock Remastered as compatible with current hardware as possible. However, if you are experiencing problems when running BioShock Remastered, please read on.

The latest version of the FAQs can be found by selecting the FAQs button in the Support tab of the BioShock Remastered pre-game Options window (this is the window that opens when you launch the game), or by going straight to the Feral website: http://support.feralinteractive.com

Contacting Feral

If the FAQs and/or updates do not solve your problem, then please feel free to contact us. The following information must be obtained before contacting Feral Technical Support:

  • The error message displayed when the problem occurred (if any).
  • A BioShock Remastered Report.txt file. This contains:
    • An Apple System Report of your Mac
    • Any crash logs that exist for BioShock Remastered
    • A list of the game's contents


All the information required can be obtained by opening BioShock Remastered and clicking on the Support tab in the BioShock Remastered pre-game Options window. In the Support tab, click on the Generate Report button. Once the report is generated it will appear as a file in your ~/Downloads folder (the “~” symbol refers to your home directory). Now click on the Create Email button. Remember to attach the BioShock Remastered Report.txt file to your email.

In your email, please include a brief description of the problem you have experienced with BioShock Remastered.

email: support@feralinteractive.com

16

Warranty

Please check the warranty information provided by Steam.

Credits

Originally developed by:
2K Games
Originally published by:
2K Games
Macintosh development by:
Feral Interactive
Macintosh publishing by:
Feral Interactive
17

Explore our website to read news and find our complete range of exciting games, or visit the web store to see our current deals and offers.