Middle-earth™: Shadow of Mordor™ - manual

Middle-earth: Shadow of MordorManual

Enter
x

Navigating this manual

Welcome to the Middle-earth™: Shadow of Mordor™ web manual.

You can use the Contents menu on the left to skip directly to the section you're looking for. Alternatively, click the Enter button to access the manual, and use the Next and Previous buttons to navigate page by page.

Can't find what you're looking for? There's even more information in the FAQs and ReadMe: you can view them using the buttons at the top of the screen.

Warnings & Ratings

Important Health Warning About Playing Video Games

Photosensitive Seizures

A very small percentage of people may experience a seizure when exposed to certain visual images, including flashing lights or patterns that may appear in video games. Even people who have no history of seizures or epilepsy may have an undiagnosed condition that can cause these “photosensitive epileptic seizures” while watching video games.

These seizures may have a variety of symptoms, including lightheadedness, altered vision, eye or face twitching, jerking or shaking of arms or legs, disorientation, confusion, or momentary loss of awareness. Seizures may also cause loss of consciousness or convulsions that can lead to injury from falling down or striking nearby objects.

Immediately stop playing and consult a doctor if you experience any of these symptoms. Parents should watch for or ask their children about the above symptoms—children and teenagers are more likely than adults to experience these seizures. The risk of photosensitive epileptic seizures may be reduced by taking the following precautions: Sit farther from the screen; use a smaller screen; play in a well-lit room; and do not play when you are drowsy or fatigued. If you or any of your relatives have a history of seizures or epilepsy, consult a doctor before playing.

Precautions to take during use

  • Sit a good distance away from the monitor.
  • Avoid playing if you are tired or have not had much sleep.
  • Make sure that the room in which you are playing is well lit.
  • Rest for at least 10 to 15 minutes per hour while playing a video game.
ESRB: M PEGI: 18
Required logos: WB Games, Monolith, New Line Cinema, MGM, Middle-earth, Autodesk Gameware, Havok, Wwise, Feral. MIDDLE-EARTH: SHADOW OF MORDOR © 2014–2015 Warner Bros. Entertainment Inc. Originally developed by Monolith. Developed for and published on Linux and Mac by Feral Interactive Ltd. © 2014–2015 New Line Productions, Inc. © The Saul Zaentz Company. MIDDLE-EARTH: SHADOW OF MORDOR, THE HOBBIT, and the names of the characters, items, events and places therein are trademarks of The Saul Zaentz Company d/b/a Middle-earth Enterprises under license to Warner Bros. Interactive Entertainment. Powered by Wwise © 2006–2015 Audiokinetic Inc. All right reserved. This software product includes Autodesk® Scaleform® software, © 2014–2015 Autodesk, Inc. All rights reserved. Uses Havok™ © Copyright 1999–2015 Havok.com Inc. (and its Licensors). All rights reserved. See www.havok.com for details. Linux® is the registered trademark of Linus Torvalds in the U.S. and other countries. Mac and the Mac logo are trademarks of Apple Inc., registered in the U.S. and other countries. Feral and the Feral logo are trademarks of Feral Interactive Ltd. All other trademarks and copyrights are the property of their respective owners. All rights reserved.
WBSHIELD
MONOLITH LOGO, WB GAMES LOGO, WB SHIELD: ™ & © Warner Bros. Entertainment Inc.
(s15)

1

Introduction

Since Sauron's fall, the forces of Gondor have stood watch over the Black Gate of Mordor, guarding the entrance to the wild lands beyond. Talion, a Ranger, stands among them.

When the gate is attacked by Sauron’s army, Talion’s comrades are slaughtered and his family captured. Talion watches helplessly as his wife and child are butchered. When the Black Hand, one of Sauron's captains, cuts Talion’s throat, it seems his ordeal is at an end… but his trial has just begun.

Talion is revived by the Wraith, a creature of uncertain power and unknown purpose. Trapped between life and death and bound to the mysterious spirit, Talion must travel across Mordor to confront the Black Hand and claim vengeance.

Even with the power of the Wraith, Talion cannot prevail alone. He must undermine Sauron’s army from within, sowing dissent and turning the Dark Lord’s Uruks to his own purpose. Only when the enemy is on its knees will he exact his revenge.

All the while, Talion must share his body with the Wraith, whose identity and motives remain a mystery. Its magic could be a powerful weapon, but power has a will of its own, and that which shines brightest hides the darkest secrets…

2

Installation

As part of the Steam download process, the game has already been installed on your computer. To start playing the game, read the Getting Started section.

Getting Started

  1. Double-click on the Steam application icon. By default this is located in the Applications folder on your computer's hard drive.

  2. If you are not already signed in, the Steam Login dialog will appear. Enter your account name and password, then select Login.

  3. The Steam application will launch. Select the Library tab.

  4. In the library, highlight Middle-earth: Shadow of Mordor in the list of games on the left-hand side of the window, then select Play.

  5. The Middle-earth: Shadow of Mordor pre-game Options window will appear. Click on the Play button. The game will launch.

  6. After the loading screens, a screen will appear asking you to adjust the game's gamma level. Use the Left and Right arrow keys to adjust the gamma to your preference, then press the Space bar.

  7. The Main Menu will appear. Select Play.

  8. The Select Game Mode screen will appear. Select Story Mode.

  9. After the opening video, you'll find Talion, a Ranger of Gondor, sparring with his son Dirhael…

3

Controls

You can play Middle-earth: Shadow of Mordor using either a keyboard and mouse or a gamepad.

The instructions in this manual refer to the default keyboard controls; if you have customized your controls or are using a gamepad, these will not apply.

Keyboard

The default keyboard controls are detailed below. You can customize your keyboard configuration by selecting OptionsKeyboard & Mouse from the Main Menu.


General
Move W / A / S / D
Dodge / Sprint / Climb Space
Grab / Interact Control (ctrl)
Wraith World V
Branded activate I
Branded dispatch K
Enter / Exit map M
Dynamic menu shortcut Return (↩)
Toggle photo mode P

Combat
Stealth Shift (⇧)
Strike / Kill (in stealth) / Charge bow attack Left Mouse button
Counter / Brutalize (in stealth) / Aim bow Right Mouse button or Alt (⌥)
Bow distract / Stealth attract G or Middle Mouse button
Wraith stun / Drain / Drop down E
Execution F
Combat drain C
Wraith flash R
Wraith burn T
Throw daggers Q
Lethal shadow strike / Identify target X
Shadow strike Z
Activate weapon power 2
4

Gamepad

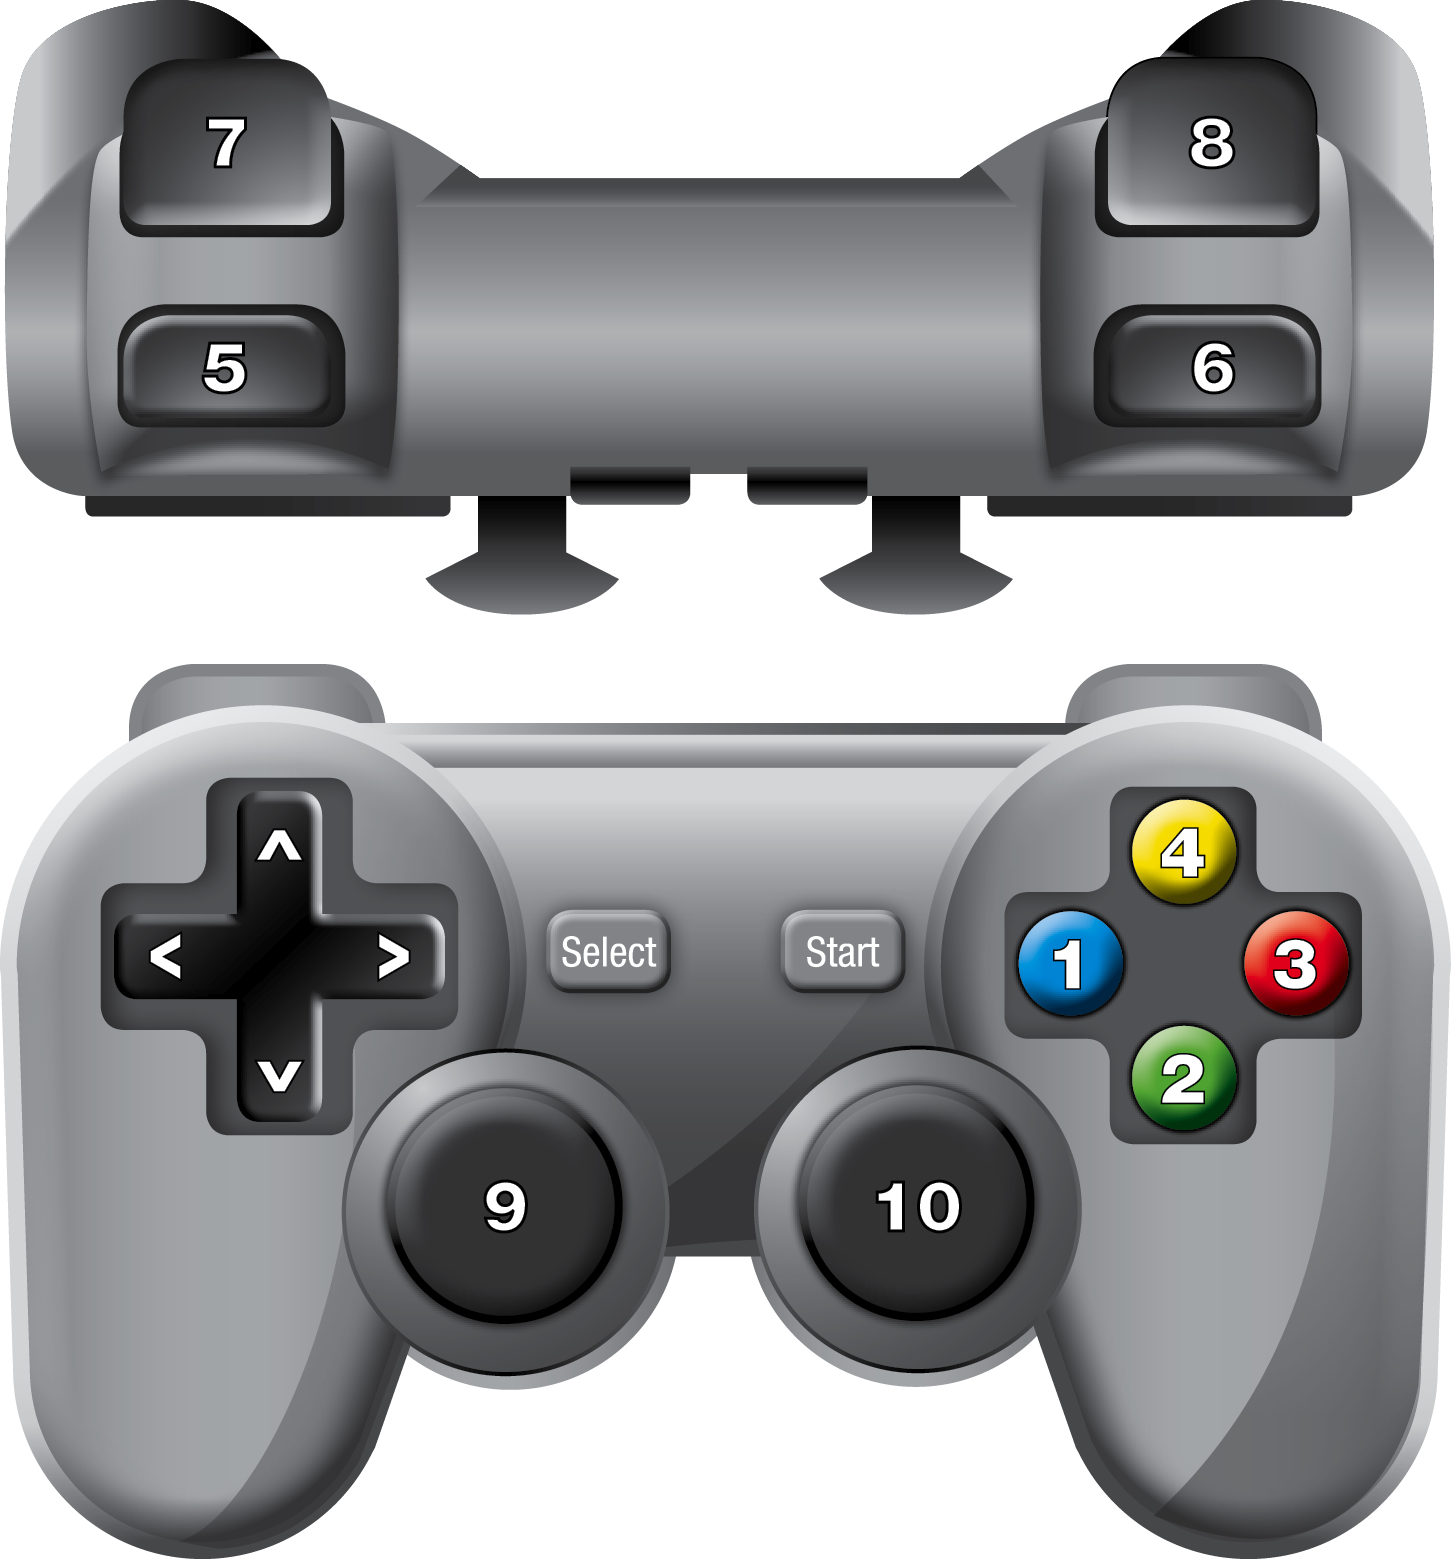
You can play Middle-earth: Shadow of Mordor using a gamepad.

The diagram on this page is based on a standard controller layout; all gamepads have similar buttons but some may differ in layout from the one shown here. For more information, see Can I play Middle-earth: Shadow of Mordor with a gamepad? in the FAQs.

Gamepad control diagram

Move
Camera movement
Enter Wraith World
Interact
Grab hold
Throw daggers
Ranged mode hold
Stealth hold
Attack
Counter
Roll
Run hold

Wraith stun / Climb down
Drain / Brand / Drop to ground hold
Activate branded
Kill branded
Identify target click
Map
Menu
5

Game Screen

game screen

1 Objectives
2 Hit streak
3 Enemy awareness indicator
4 Mini-map
5 Health meter
6 Focus meter
7 Elf-shot
6

Exploring Mordor

Map

To open the map, press the M key.

map

Missions Forge tower
Main mission Talion
Power struggle Worm/intel
Outcast rescue Artifact
Sword legend Ithildin
Dagger legend Rune
Bow legend Herb

To see a full list of map icons, select Legend while viewing the map.

Forge Towers

Forge towers are located across Mordor. The origin of these ancient ruins is unknown, but while you are in the Wraith World, the majesty of their original form can be seen.

You can “reforge” towers to unlock them. Unlocking forge towers awakens the Wraith’s memories, revealing new missions and collectibles in the surrounding area on the map.

To reforge a tower, climb to the top, approach the anvil that stands in the center, and press the Left Control (ctrl) key.

Fast Travel

On the Map screen, you can fast travel between unlocked forge towers. To do so, place the mouse cursor over the icon of the forge tower to which you want to travel and press the X key.

Advance Time

To advance time, place the mouse cursor over the icon of an unlocked forge tower on the map and press the Z key. The game will skip ahead to the near future and you'll be transported to the forge tower you selected.

Advancing time allows herbs to regrow and power struggles in Sauron's army to play out.

Strongholds

Strongholds are heavily fortified Uruk garrisons. They contain a huge number of enemies, often including multiple captains, and are the base of operations for enemy warchiefs (see Sauron's Army for more information about captains and warchiefs).

Be careful: when an enemy discovers you in a stronghold, he will raise the alarm, alerting all other enemies in the stronghold to your presence. However, if you manage to remain hidden for long enough, the alarm will eventually be called off.

7

Combat

Attacking

Click the Left Mouse button to attack an enemy.

Landing multiple blows on an enemy may stun him (indicated by white stars floating above his head). Hitting a stunned enemy will knock him to the ground, making him vulnerable to a ground execution.

Hit Streak

During combat, a hit streak counter will appear on the left-hand side of the screen. The hit streak will increase with each successful strike or counter. Missing your enemy or failing to counter an attack will reset your hit streak to zero.

Last Chance Struggle

When your health drops to zero, you’ll be given a final chance to avoid death. Move your mouse into the circle that appears and press the key shown on the screen to recover from the near-death situation.

You only get one last chance struggle during each fight, so use it wisely. If your health drops to zero again, you'll die.

Countering

To counter an attack, click the Right Mouse button when an enemy is about to attack you.

You can counter two enemies simultaneously by clicking the Right Mouse button twice in quick succession.

Ranged attacks and some powerful melee attacks (indicated by a red icon above an enemy’s head) cannot be countered: instead, you must dodge them.

Dodge and Vault

To dodge, press the Space bar while moving.

To vault over an enemy, press the Space bar while standing next to him. This gives you the opportunity to attack him from behind.

Grab and Throw

To throw an enemy, press the Left Control (ctrl) key while standing next to him.

To grab and hold an enemy, hold down the Left Control (ctrl) key. You can then use him to shield yourself from other enemies’ attacks.

While you are holding an enemy, you can perform the following actions:

  • Left-click to shank him, damaging him and increasing your hit streak;
  • Press the E key to drain him and recharge your Elf-shot;
  • Press the Space bar to interrogate him.
8

Dash Attack and Tackle

To perform a dash attack or tackle, hold down the Space bar and run towards an enemy. When you're near him:

  • Tap the Left Control (ctrl) key to lunge and attack;
  • Or hold down the Left Control (ctrl) key to tackle him to the ground.

Ground Execution

To execute an enemy lying on the ground, hold down the Left Shift (⇧) key, move next to him, then left-click.

Ranged Attacks

Hold the Right Mouse button to draw your bow.

With your bow drawn, hold the Left Mouse button to charge your shot, then release it to fire.

For the most effective attack, charge your shot fully and aim for the head.

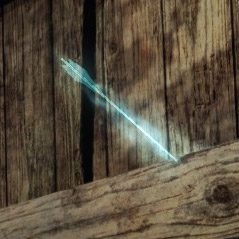
Elf-shot

Image of elf shot

Your ammo is shown by the blue bar on the right-hand side of the mini-map.

To recharge your ammo, you must collect Elf-shot, which you'll find scattered across Mordor. Elf-shot is indicated by white arrow icons on the mini-map.

You can also regain Elf-shot by draining your enemies.

Focus

Focus allows you to slow time while aiming. This gives you longer to fix your target and fire.

Your Focus is limited, and is indicated by the white bar on the right-hand side of the mini-map. While time is slowed, the bar will drain. When it is empty, time will return to normal speed. Your Focus recharges whenever you are not using it.

When you draw your bow, time is slowed automatically and your Focus will drain. To deactivate time-slowing and preserve your Focus, press the Space bar.

9

Stealth

Hold down the Left Shift (⇧) key to enter stealth mode. While you’re in this mode, enemies are less likely to become aware of your presence.

You enter stealth mode automatically when in tall bushes.

Use the environment to your advantage: enemies are less likely to notice you when you're above or below them, so climb walls and hang from ledges to avoid detection.

Awareness Indicator

Image of awareness indicator

When an enemy begins to notice you, an awareness indicator will appear over his head: yellow indicates that he is suspicious and will search the area, while red indicates that he has noticed you and will attack.

When an enemy spots you, a ghost outline of the Wraith will appear to indicate where he saw you. He's sure to come and investigate, so move away from that location to avoid being discovered.

Stealth Finisher

While in stealth mode, you can kill an enemy without alerting others by approaching him until he is highlighted in red and then left-clicking.

Aerial Takedown

To perform an aerial takedown, hold down the Left Shift (⇧) key to enter stealth mode while you're above an enemy, move into position until your target is highlighted in red, then left-click. You will jump down from your position and knock him down.

Ledge Kill

To perform a ledge kill, hold down the Left Shift (⇧) key while hanging on a ledge below an enemy, move into position until your target is highlighted in red, then left-click. You will quietly kill your target and pull the body over the ledge without other enemies noticing.

Attract and Distract

To attract an enemy to your location, hold down the Left Shift (⇧) key to enter stealth mode and approach an enemy until they are highlighted, then press the G key to attract them to your position.

To distract an enemy and draw their attention to a specific location, draw your bow, aim at a location, and press the G key. Nearby enemies will be attracted to the spot at which you were aiming.

10

Wraith Powers

Immortality

The Wraith inhabits a world between light and darkness, and has used his own immortality to help Talion cheat death. As long as the Wraith is with you, you cannot be killed permanently.

If you die, you’ll be resurrected at the nearest forge tower. While you wait to return to life, time passes: Sauron’s army will grow in strength and your nemeses will grow in power. They will be harder to defeat when your paths next cross.

Wraith Stun

The Wraith stun temporarily blinds enemies and prevents them from fighting back. Once an enemy is stunned, you can attack him with a flurry of blows (see Flurry below).

To perform a Wraith stun, press the E key while near an enemy.

Flurry

To attack your enemy with a flurry of blows, left-click repeatedly after using a Wraith stun. The faster you click, the more blows you will land.

Wraith World

Talion's connection to the Wraith has given him the ability to enter the Wraith World, revealing secrets invisible to mortal eyes.

To enter or leave the Wraith World, press the V key.

While in the Wraith World, enemies are highlighted, and you can see through physical objects such as walls. Ordinary Uruks glow blue, your nemeses glow red, and worms (see Interrogating Enemies below) glow green.

Interrogating Enemies

Interrogating enemies allows you to gather intel on your nemeses, revealing their identities, power, and strengths and weaknesses.

To interrogate an enemy, first hold down the Left Control (ctrl) key to grab them, then press the Space bar: your Wraith powers allow you to penetrate his mind, and you’ll be given the option to gain intel or simply kill him. If you choose to gain intel, you’ll be taken to the Sauron’s Army screen, where you can select a nemesis to reveal information about him.

Image of worm icon

Any Uruk can reveal a nemesis captain’s identity, but to learn his strengths and weaknesses, or to identify a warchief, you’ll need to interrogate either a captain or a worm. Worms are Uruks with special intel on enemy nemeses, and can be identified by a green icon above their heads or by their green glow while in the Wraith World.

You can also gain intel by finding documents in enemy campsites.

11

Sauron's Army

Nemeses

Middle-earth: Shadow of Mordor’s nemesis system means that each Uruk you fight has the opportunity to become one of your nemeses, with a unique combination of strengths and weaknesses and a personal vendetta against you.

Your nemeses comprise “captains”, who command the ordinary Uruk grunts, and “warchiefs”, the highest-ranked leaders. You can view your nemeses in the Sauron’s Army screen. To do so, select Sauron’s Army from the in-game Pause menu.

You won't be able to see any details about a nemesis until you've gathered intel on him and uncovered his identity: nemeses whose identities you do not know will appear as silhouettes. You can discover who they are by gathering intel, either by finding documents located in enemy camps or by interrogating your enemies.

You can also identify a nemesis by entering the Wraith World. To do so, you must have him within sight: once he's visible, enter the Wraith World, highlight him, and press the X key to identify him.

You may even cross paths with an unknown nemesis while exploring Mordor, in which case his identity will be revealed. However, coming face-to-face with an enemy before you know how powerful he is can be a deadly mistake.

Once you've identified a nemesis, place the mouse cursor over him in the Sauron's Army screen to see more details about him. Each nemesis has a unique set of strengths and weaknesses, as well as a power rating: the higher his power, the more difficult he'll be to kill, but the greater will be the reward for doing so.

Relationships

There’s a pecking order in Sauron’s army: the weaker captains are shown at the front of the Sauron's Army screen, and the more powerful towards the back. At the very back are the warchiefs, the strongest of the Uruk commanders.

Some nemeses have relationships with others. For example, a captain may be the bodyguard of a warchief. When you place the mouse cursor over a nemesis, his relationships will be indicated by lines between him and other nemeses.

Some relationships are related to power struggle missions, including duels and executions.

12

Fighting Nemeses

You'll earn power and runes for defeating a nemesis in combat. The more powerful the nemesis, the higher the power of the rune he'll drop and the more power you'll earn.

Be warned: defeating a nemesis doesn’t always mean you’ve seen the last of him. Some nemeses will return, bearing the scars of your last battle and a terrible hunger for vengeance.

Being defeated by a nemesis can have grave consequences. Nemeses who kill you will grow in power, and they won’t hesitate to gloat about your death when you next meet. While you're waiting to return to life, other nemeses may also grow in strength.

If you're killed by an ordinary Uruk, he will be promoted to a captain and enter Sauron’s army as a new nemesis.

Marking Targets

To mark an enemy as a target, select him in the Sauron's Army screen and select Mark Target. His position will now be marked on your mini-map with a skull icon, making him easier to track down.

Strengths and Weaknesses

Each of your nemeses has a unique combination of strengths and weaknesses.

Strengths can include invulnerability to certain types of attack and bonuses in combat. If you know a nemesis's strengths, you can try to avoid situations in which they'll give him an advantage.

Conversely, enemies may be weak against certain types of attack or suffer penalties in combat. For example, a nemesis afraid of caragors will stop attacking and flee when confronted by one.

If you know a nemesis's strengths and weaknesses, you'll have a distinct advantage when fighting him. Discover your nemeses' strengths and weaknesses by interrogating worms or captains.

13

Missions

There are various types of mission to complete across Mordor, from main story missions to Uruk power struggles.

The start points for missions are indicated by colored shield icons on the map.

To begin a mission, approach its start point and, when prompted, press the Left Control (ctrl) key.

You can leave a mission at any point by selecting Leave Mission from the in-game Pause menu. You may restart it later by returning to its start point.

Power Struggle

The Uruks in Sauron’s army compete for status and often fight among themselves, creating power struggles that you can exploit.

There are various types of power struggle, including duels, betrayals and ambushes. To earn power, you should intervene in them.

You can often gain power just by being present at the struggle, but you can also interfere to swing a battle in favour of one Uruk or the other. It may also be an opportunity to take out multiple nemeses at once.

Outcast Rescue

As you travel through Mordor, you’ll see slaves being worked by their Uruk masters. Some slaves have a fist icon above their heads, and freeing one of these slaves by killing their master will unlock a nearby outcast rescue mission.

Completing outcast rescue missions usually involves freeing more slaves, and will reward you with experience and Mirian. Slaves will also be more likely to help you in future by providing intel on captains once they're freed or by fighting back against their captors.

14

Weapon Legend

As you unlock new abilities, you’ll be able to complete weapon legend missions for each of your three weapons.

Completing weapon legend missions rewards you with experience and Mirian.

If you complete all the weapon legend missions for a particular weapon, the Wraith will reforge it, and its appearance will be improved.

Vendetta

If a player on your Steam friends' list is killed by one of their nemeses, you may be given the opportunity to avenge their death in the form of a vendetta mission to kill that nemesis. You gain power for completing vendetta missions.

Likewise, if you're killed by one of your nemeses, another player on Steam may be able to avenge you! If they're successful, a message will appear in-game to let you know.

If you don't have anyone on your Steam friends' list who plays Middle-earth: Shadow of Mordor, don't worry! You'll still receive vendetta missions from other players on Steam.

Survival and Hunting Challenges

Survival and hunting challenges are optional objectives that you can complete while exploring Mordor. They require you to hunt and kill local wildlife or collect certain types of herbs. You’ll be rewarded with Mirian for each challenge you complete.

To view the available challenges, press the M key to open the map: the challenges are displayed on the left-hand side of the screen. Completing one challenge unlocks the next: each new challenge will be more difficult than the last, but will also offer a greater reward.

15

Character Development

Throughout the game, you'll earn experience, power and Mirian. These can all be used to upgrade Talion's attributes and abilities.

To see the available upgrades, select Upgrades from the in-game Pause menu. The Upgrades menu contains three tabs: Abilities, Attributes and Progression. You can navigate between these tabs using the 1 and 2 keys.

Within these tabs, you can assign ability points to unlock new abilities, purchase new attributes using Mirian and view your progress in the game.

Power

You earn power for each nemesis you defeat. You can also earn power by completing power struggle missions and some of the main missions.

Increasing your power unlocks new ability tiers.

Experience

You earn experience for killing enemies, completing missions and other actions, such as freeing slaves. Killing enemies using special moves, such as stealth kills and combat finishers, will earn you extra experience.

Once you earn enough experience, you’ll receive an ability point that you can use to purchase a new ability.

Abilities

You can view your abilities in the Abilities tab.

Abilities are organized into two trees: Ranger abilities improve your stealth and swordsmanship, while Wraith abilities enhance your archery and Wraith powers.

You can purchase new abilities using ability points, which are earned by gaining experience. The amount of experience you must gain to earn your next ability point is shown at the top of the Abilities tab.

Abilities are split into five tiers. When you start the game, only the first tier of abilities in each tree is unlocked. Increase your power to unlock more ability tiers, allowing you to purchase more powerful abilities using your ability points. The amount of power you must gain to unlock the next tier is shown at the top of the Abilities tab.

Attributes

Attributes are upgrades that improve your health, Focus, Elf-shot and weapons. You can view your attributes in the Attributes tab.

You can purchase attributes using Mirian.

16

Collectibles

Mirian

Mirian is used to upgrade Talion’s weapons and attributes, including his maximum health and Focus. You can earn Mirian by finding artifacts and Ithildin, completing side missions, achieving bonus objectives, and converting runes.

Opportunities to earn Mirian are marked by white symbols on the map.

Herbs

All across Mordor, you’ll find herbs that can be used to restore your health.

To pick a herb, approach it and press the Left Control (ctrl) key: your health will be fully restored.

There are many different types of herb, but all of them have the same effect of restoring your health.

Survival challenges require you to pick specific types of herb. The types of herb that can be found in an area are shown when you place the mouse cursor over that area on the map.

Runes

You can apply runes to give your weapons powerful upgrades.

To apply runes to weapons, select Weapons & Runes from the in-game Pause menu.

Every time you defeat a nemesis, you’ll earn a new rune. The more powerful the nemesis, the higher the power of the rune you’ll earn for defeating him.

Each of your weapons starts with one rune slot, but you can upgrade them with Mirian to hold up to five runes.

To add a rune to a weapon, click on a slot in the Weapons & Runes screen, then double-click on the rune you want to add. Adding a rune isn’t irreversible: if you change your mind later, you can replace one rune with another.

You can also convert runes into Mirian. To do so, click on the rune to select it and click on the Convert into Mirian button or press the X key. Once converted, you cannot change the Mirian back into a rune.

17

Artifacts

Artifacts can only be found while in the Wraith World. To collect an artifact, enter the Wraith World, approach the artifact, and press the Left Control (ctrl) key.

Once you’ve found an artifact, you'll be able to examine it. Click and drag the artifact to rotate it until you find its memory point (indicated by a blue glow), which can be used to uncover one of the Wraith's buried memories. Once you’ve found the point, press the X key to reveal the memory.

For each artifact you collect, you earn a reward of Mirian.

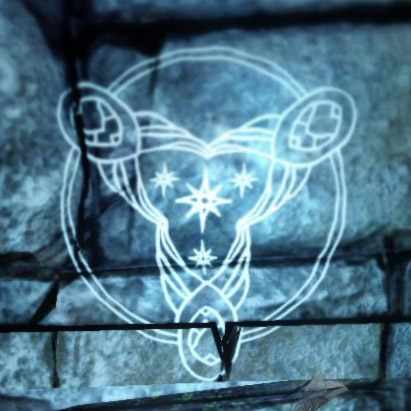
Ithildin

Image of Ithildin

Ithildin are ancient symbols that can be found carved into the living stone and ruins of Mordor. These markings can only be found while in the Wraith World. To collect Ithildin, enter the Wraith World, approach it, and press the Left Control (ctrl) key.

For each piece of Ithildin you collect, you earn a reward of Mirian.

18

Technical Support

Every effort has been made to make Middle-earth: Shadow of Mordor as compatible with current hardware as possible. However, if you are experiencing problems when running Middle-earth: Shadow of Mordor, please read on.

The latest version of the FAQs can be found by selecting the FAQs button in the Support tab of the Middle-earth: Shadow of Mordor pre-game Options window (this is the window that opens when you launch the game), or by going straight to the Feral website: http://support.feralinteractive.com

Contacting Feral

If the FAQs and/or updates do not solve your problem, then please feel free to contact us. The following information must be obtained before contacting Feral Technical Support:

  • The error message displayed when the problem occurred (if any).
  • A Middle Earth Shadow of Mordor Report.txt file. This contains:
    • An Apple System Report of your Mac
    • Any crash logs that exist for Middle-earth: Shadow of Mordor
    • A list of the game's contents


All the information required can be obtained by opening Middle-earth: Shadow of Mordor and clicking on the Support tab in the Middle-earth: Shadow of Mordor pre-game Options window. In the Support tab, click on the Generate Report button. Once the report is generated it will appear as a file in your ~/Downloads folder (the “~” symbol refers to your home directory). Now click on the Create Email button. Remember to attach the Middle Earth Shadow of Mordor Report.txt file to your email.

In your email, please include a brief description of the problem you have experienced with Middle-earth: Shadow of Mordor.

email: support@feralinteractive.com

19

Warranty

Please check the warranty information provided by Steam.

Credits

Originally developed by:
Monolith Productions
Originally published by:
Warner Bros. Interactive Entertainment
Macintosh development by:
Feral Interactive
Macintosh publishing by:
Feral Interactive
20

Explore our website to read news and find our complete range of exciting games, or visit the web store to see our current deals and offers.